MultiRes and Deformable Mesh(Com_Skin) object:


You can use MultiRes to generate the detail levels for your deformable mesh objects. When we first
tried it in 3DSMAX 3 , it didn't work. It resulted in an instant crash of 3DSMAX. So, the way it works is
that you have to make a copy of the mesh in the exact same position as the skinned mesh. One copy
contains the weighting information, the other contains the MultiRes information.


당신의 오브젝트에 세부 단계를 두기 위해, 'MultiRes' 를 사용할 수 있습니다. 처음 적용했던건
맥스3에서였는데, 실패했습니다. 맥스에서 크래쉬가 난거죠. 그래서, 방법은 , 기존의 스킨으로 연결된
오브젝트와 완전히 동일한 위치에, 복사본을 만드는 겁니다. 하나는 웨이트값의 정보를 담고있고,
다른 하나는 MultiRes의 정보를 가지고 있는거죠.


What you will need to do is clone the skinned object (using Tools >> Snapshot) at frame 0 in your
3DSMAX scene. Choose single, with mesh output. The exporter uses frame 0 as the reference frame
for comparison of the vertex positions so it can reconstruct the shape.

그래서, 0 프레임에 오브젝트의 '복제본'을 만드세요.( Tools -> Snapshot) .single, 그리고 mesh를 선택합
니다. 익스포터는 0프레임을 버텍스 위치의 참고용으로 삼을 것이고, 때문에 다시, 원상태로 돌아올 수 있습니다.

사용자 삽입 이미지

Don't use edit > clone to make a new shape. If you do so, the mesh will be in the initial position
that object was in before it was skinned and put in the root position. The 'skinned' mesh and the
MultiRes mesh must be in the EXACT same position ( all the vertices must be in the exact same place)
or it will not export properly.


edit -> clone 으로 새로운 메쉬를 만들지 마세요. 그렇게 한다면, 루트포지션의 초기 포즈로 되돌아갈겁니다.
스킨이 적용된 메쉬와, MultiRes가 적용된 메쉬는 정확히 같은 위치에 - 모든 점들까지도 - 있어야 합니다.
그렇지 않으면 제대로 익스포트 되지 않을겁니다.


This will give you and editable mesh in the exact same position as the skinned mesh. Rename this
mesh MultiRes:: and then link it to the skinned mesh. Apply a MultiRes modifier and hit the generate
button.


스킨 적용된 메쉬와 같은 위치에 메쉬가 있습니다. MultiRes:: 라고 새로 이름지어 주세요. MultiRes를
적용시키시고, generate 버튼을 누르세요.


Use the 'AdjustLODs' script to generate the value in the shapes User Properties using the method
covered in Section 1 : Multires.

Section1 의 MultiRes 에서 설명했던 메소드를 사용하는 메쉬의 User Properties를 'AdjustLODs'
스크립트를 사용해서 값을 생성시키세요.


You will have two copies of your shape in the scene. One with the skin modifier and one with the
MultiRes modifier. If you change either object you'll have to 'synch' them up again ( i.e, repeat the
procedure we just went through).


그렇다면 화면에는 두개의 오브젝트가 있을겁니다. 하나는 스킨, 하나는 MultiRes가 적용된 상태의
오브젝트가요. 만약 둘중에 하나를 바꾸거나 했다면 다시 싱크를 맞춰줘야 합니다.
(우리가 했던 작업을 다시 언급한겁니다)


Note: shape made using MultiRes in 3DSMAX 3 will generate a 'Missing OSM' ( Missing Object Space
Modifier) warning when you open them in 3DSMAX 4. To solve this problem, delete the 'Missing OSM'
from the top of the modifier stack of the objects that generate this error and add a new MultiRes modifier
to the object ( don't forget to hit the generate button).

주의 : 맥스 3에서와 맥스 4의 연동 이야기. 필요는 없어 보인다. 문제가 생긴다면 Missing OSM 이라는 스택
을 지워주란다.


3DSMAX 4 won't crash if you put a MultiRes modifier on top of a deformable mesh (skin ) object, but
you still have to make the clone or the exporter will not recorgnize it.

맥스4에서는 MultiRes 모디파이어가 맨 위에 있어도 별 문제가 없습니다. 그러나 여전히 클론을 만들어줘서
익스포터가 인지하도록 하는 것에는 변함이 없습니다.


Note: The meshes must be in EXACTLY the same position of it will not work properly ! it will export,
but in the engine it will look like a big spiky ball of polygons.

주의 : 메쉬가 정확히 같은 위치에 있지 않다면 제대로 되지 않을겁니다. 익스포트는 되지만, 엔진에서
큰 대못같은 폴리곤 덩어리로 보일겁니다.


토크의 여러 예제중에서, T3D 에서 성공적으로 출력되던 캐릭터가 StrongHold 에서는 이래저래

꼬여 출력되었다. 뉭귀미...  스트롱홀드에서 사용된 토크오크 캐릭터는 T3D 에서와 별 차이 없어 보이건만.

덕분에 토크오크의 셋팅과 맞춰보겠다고 쇼를 하고 있는데 MultiRes 에 막혀 detail level을 생성할 수 없어

결국 번역작업을 강행,


이 전 장에 있는 일반 shape의 MultiRes 섹션을 더 봐야겠다.


라고 생각했으나,


사용자 삽입 이미지

이것이 바로 adjustLODs 라는 맥스스크립트를 구동하여 뜨는 셋팅 창.

그래. MultiRes라는 모디파이어는 크래셔와 마찬가지로 적용된 오브젝트의 폴리곤 수를 줄여주는

기능인데, 이거랑  detail 더미들이랑 어떻게 연결시켜?   라고 생각했건만,

garageGame 웹에서도 이 스크립트를 사용하라고 나와있다.


근데 구할 수가 없네?

http://www.maxplugins.de/ 에도 없고

http://www.scriptspot.com/ 에도 없다.

http://fosters.realmwarsgame.com/maxdts/section1.html 의 링크도 다운불가.


..........................


갑자기 토크가 너무너무너무너무 사랑스러워지면서 만지기 싫어졌다.


안해!!!!! -_-++++


Posted by 夢現 和
:
사용자 삽입 이미지

캐릭터 선택화면.

스크립트 파일에서 경로를 수정해서 torque Orc 캐릭터 대신 바꿔치기 하고,

몇개의 dsq파일은 직접 만들어서 넣었고,

게임에서 보이지 않는 동작들은 더미 dsq파일을 만들어서 이름만 수정해서 맞춰 넣은 다음,

몇번의 실패 끝에, 기존의 GameExample 에서 띄우는 것에 성공.


..... 랜더링해서 캐릭터를 띄워준다.


사용자 삽입 이미지
캐릭터가 돌아가있거나 잘못된 방향을 바라보고 있거나, 땅에 파묻혀 있는 상황은 다행히 벌어지지 않았고,

나름 성공적? 으로 출력되었다.


튜토리얼을 작성한 사람의 말대로, 아주 사소한 것에도 투덜대는 녀석이어서

튜토리얼이 없었다면 매우 고생했을 듯. 어흑 ㅠ.ㅠ 감사메일이라도 보내야지..


이로써 어설픈 영어실력으로 번역한 것들이 잘못되지는 않았구나 하는 결론에 이르렀다.


일주일 넘게 토크만 봤던 시간의 결과.

이제 스크립트파일, 기존의 에디터사용법, 보다 파고든 애니메이션,

dif 지형파일, 라디언트툴, 충돌체크,  아아 할게 쌓였..


Posted by 夢現 和
:
이 튜토리얼의 원 저작권은 www.smdlabs.com 에 있습니다.

3DSMAX DTS/DSQ Export


blendAnimations::

Partial body blend animations:


보정 애니메이션::
부분 보정 애니메이션:


1. Partial body blend animations: You know, I sat down before dinner to write this guide, and well .... It's
   been 3 hours!!  I'm getting hungry, but your worth it, so I'll finish.  We are almost you know! Ok, for the
   last section I'm only going to talk about the differences between full body animation and blend animation.
   NEVER, I REPEAT, NEVER set a key in the Blend Reference Time setting located in the Sequence01
   helper node. Every time I did, 3dsMax crashed to the desktop. So, If your into that sort of thing, then go
   ahead.. Have fun!!


1. 부분 보정 애니메이션: 음, 저녁 먹기전에 앉아서 쓰기 시작한 이 가이드가 음... 세시간이 됬습니다. 배고파요.
   하지만 당신에게 가치가 있으니까, 끝낼겁니다. 거의 다 왔습니다. 마지막 섹션에서 전 full body 애니메이션과
   부분 보정 애니메이션의 차이에 대해서 말할겁니다. 절대로, 다시말하지만 절대로!!! 시퀀스 헬퍼노드에 있는
   Blend Reference Time에 키를 주지 마세요.  할 때 마다 맥스는 뻑났습니다. 자 준비가 되었으면 가보죠.


2. Ok, repeat steps 1-A thru 1-D in the Full body non-blend animation section above. This time though,
   when you start animating, leave the root pose at Frame 0 intact, and start animating at Frame 1. If you
   are working on the arms in the look animation, then start Frame 1 at highest point, and make the last
   frame the lowest. I used about 10 to 15 frame for mine, but your the artist .. Do what you want!   I fought
   the exporter for what seemed like an eternity on my first blend. The thing kept crashign Max out to the
   desktop. I finally figured out that you DON'T set the Blend Reference Time key in the Sequence01 object,
   but instead have Frame 0 be your 'Blend reference pose'. If you set your mainModelDTSFile.max  file up like I showed you, then this 'Root' position is already there for the blends, just start animating at
  Frame 1 and leave Frame 0 alone.

2. 자, 이전의 단계인 보정없는 전신 애니메이션 과정 1-A부터 1-D까지 복습하세요. 이번에는, 애니메이션 작업을
   하되 0 프레임의 기본 포즈는 그대로 두는 대신, 1프레임부터 애니메이션 작업을 하세요. 만약 팔을 가지고
   '보는' 애니메이션 작업을 한다면 1프레임에 가장 높은 위치를 두고, 마지막 프레임에 가장 낮은 위치를 주세요.
   제 작업물은 10에서 15프레임 정도였지만, 당신은 아티스트니까... 마음대로 하세요. 저는 작업의 특정 부분이
   영속적인 첫 보정이 되도록 하기 위해 익스포터와 싸웠지만, 맥스는 그때마다 뻑났습니다.  저는 결국 Blend
    reference time에 키를 주는 대신 0프레임에 '보정 참고용 포즈' 를 주는 방법을 알아냈습니다. 제가 보여준
   대로 메인모델의 맥스파일을 작업했다면, 이러한 '뉴트럴포즈'는 전부 제대로 있을 것이므로, 단지 1프레임에서
   부터 애니메이션 작업을 하세요. 0프레임은 그대로 놔두고.


3. Another slight difference for stop 1-D above is to start the Sequence Begin/End keys in the Track View for the Sequence01 object at Frame 1 instead of Frame 0. Let me say that again : set your first key to 1 instead of 0 and obviously set the last key to the last frame of your blend animation sequence.


3. 1-D 작업과의 또다른 작은 차이는, Sequence01 오브젝트의 트랙뷰에서 Sequence 시작/끝의 키가
   0이 아니라 1이라는 겁니다. 다시한번 말하죠. 시작키는 0이 아니라 1이며, 당신의 보정애니메이션의 끝에
   end 키를 주세요.


4. Now with the Sequence01 object still selected, click the Modify tab from Max and Unchecked the Cyclic sequence check box and Check the Blend Sequence check box in the Sequence01 object.

 A. Finally, go back to your Utility tab; DTS Exporter Utility button and click the exporter Sequence    button. Save this .DSQ file in the same directory as your main .DTS file and your other .DSQ files.


4. 자, 시퀀스01 오브젝트가 선택된 상태에서, modify 탭으로 들어가셔서 Cyclic sequence 체크박스를 해제
    하시고, blend sequence의 체크박스에 체크하세요.
 
 A. 마지막으로, DTS Exporter Utility 버튼을 누르시고, 익스포트 하세요. 이 파일을 당신의 메인 DTS 파일,
    그리고 다른 DSQ 파일들이 있는 곳에 저장하세요.


사용자 삽입 이미지


ps - 번역이 매끄럽지 못하여  무슨 뜻인지 이해가 안가는 부분도 있지만.. 추후 실 작업을 진행 후 수정할겁니다
      >.<
Posted by 夢現 和
:
이 튜토리얼의 원 저작권은 www.smdlabs.com 에 있습니다.

3DSMAX DTS/DSQ Export

fullAnimations::


Full body NON-blend animation


1.Full body non-blend animations: In the following steps you should delete the model mesh from your max  scene when you are exporting DSQ files. This is why should have backup files! For example , if your .cfg files remove unwanted bones during an animation, and you have not removed your mesh object ; the exporter will find the model mesh with skin modifier applied that has a list of the bones you have not
  exported for the animation, so it thinks your missing bones and throw an error. So, remove the mesh with
  skin modifier for all DSQ animation exports.
 
 1.full body non-blend animation: 다음스텝에서 dsq파일을 익스포트 할 때, 꼭 메쉬를 지워줘야 합니다.
  이래서 꼭 파일을 미리 백업해두어야 합니다. 예를 들어, 만약 애니메이션 동안 컨피그 파일이 원하지 않
  는 본을 지우게 된다면, 그리고 메쉬를 지우지 않았다면, 익스포터는 스킨 변형자에 의해 연결된 메쉬
   를 본의 리스트에서 찾아내게 됩니다. 고로, 잃어버린 본이라 생각하게 되고, 에러를 던집니다.
  그래서 꼭 dsq 파일을 익스포트 할 때는 메쉬를 지워줘야 합니다.


  Other things to look out for : Do not set any keys in the Blend Reference Time track of the Sequence
  dummy helper. Only set 2 keys in the sequence Begin/End track starting with the first key at frame 0 for  non-blend animations, and a key at the last frame of the animation sequence. You can overwrite the 'root'  pose and outstretched arms pose in frames 0 and 1 for full body non-blend animations, but it is worth
  mentioning that this changes with blend animations.

 눈여겨 보아야할 또 다른 것 : 시퀀스 더미헬퍼의 blend reference track에 키를 주지 마세요. 오직 시퀀스
 의 begin/end 트랙의 시작부분 0 프레임에 하나 ( non-blend ani일때) , 그리고 끝부분에 하나, 이렇게
 두개만 주세요. 뉴트럴포즈와 팔을 쫙 뻗은 포즈를 0프레임과 1프레임에 겹쳐넣으셔도 되지만, 이러한 것
 은 blend 애니메이션에서는 달라집니다.

  A. If you have loaded your mainModelDTSFile.max file, then choose file : save as and  create a  
   folder  called run inside of your Robot folder located in your Max scenes directory to save your new
     robotRun.max file. Make sure to COPY an export .cfg file to that run directory also, and delete your
     model mesh, If you want to know what is run.cfg file should look like , then here are some screen shots
    below.

  A. 메인 모델의 맥스파일을 불러왔으면, 다음엔 모델 폴더 안에 run 이라는 폴더를 생성하고, 그 안에
     save as 로 modelRun.max 파일을 복사해 넣으세요. 컨피그 파일도 복사해서 넣는걸 잊지 마시고,
     다음으론  모델의 메쉬를 지워주세요. run.cfg 파일이 어떻게 생겼냐면, 아래의 스크린샷처럼 생겼
    습니다.


   "NOTE" : The exporter doesn't care what you call .cfg file. It just looks in the directory that your current
    Max file is in. Any file called ".cfg will be used, so make sure there is only one!   Another misleading
    setting is the Load Config ...  and Save config ... buttons located in the DTS Exporter Utility. These  buttons only set the parameters, and have nothing to do with which bones or objects will be exported. Plus, if the .cfg file in your current Max folder sets any params, then they will override the ones those buttons loaded. I hope that helps.

   "주의": 익스포터는 컨피그 파일을 어떻게 이름짓던 상관하지 않습니다. 단지 폴더에 지금의 맥스파일이
    있는지만 확인합니다. 어떤 파일이든 확장자가 cfg로 붙을 수 있고, 사용될 수 있으므로 확실하게
    하나만 만드세요. 또 하나의 잘못된 셋팅은 DTS Exporter Utility에 있는 Load Config, Save Config 입니다
    이러한 것들은 수치만 조절하지, 어떤 본, 어떤 오브젝트가 익스포트 되어야 할지는 상관하지 않습니다
    또 하나 덧붙여서, 만약 현재의 맥스 폴더 안의 컨피그 파일에 어떤 수치도 정해져있지 않다면, 이러한
    버튼을 눌러서 그것들을 초기화? 시킬 수 있습니다. 도움되길 바랍니다.


 B. Since your new modelRun.max file started life as your 'mainModelDTSFile' you should be looking at
     your model in it's root pose at frame 0. I'm hoping you know how to animate, so after you animate a
     run cycle you will be ready to continue.

 B. mainModelDTSFile에서부터 modelRun.max 파일이 생성된 이후에도, 당신은 모델의 0 프레임에
     뉴트럴포즈가 있는지 확인해야 합니다. 나는 당신이 애니메이션을 어떻게 해야하는지 알고있길
     바라며, 순환되는 달리기 애니메이션을 만들 수 있다면, 다음으로 넘어가봅시다.


 C. Because you set up your .cfg file in step A!, go ahead and Click your Max Create tab; Helpers button;  and select the General DTS Object from the drop down list. Click the Sequence button and add it to your scene next to your Biped bones. My Sequence dummy box was always located inside the Bounds
    box, so I'm not sure if location it outside the Bounds box will cause any problems ... just food for thought
    You do know this exporter is picky right? :)

 C. 왜냐하면 당신은 이미 step A에서 컨피그 파일을 셋팅했습니다. 맥스의 create 탭 - helper - 리스트
     에서 General DTS Object를 누르세요. 시퀀스버튼을 누르고 바이패드 옆의 본에 드래그해서 생성하세
    요. 제 시퀀스 더미는 이미 바운드박스 안에 위치하기 때문에, 만약 바운드박스 밖에 생성했을 시
     어떤 문제가 발생할지는 전 모릅니다.  생각할 꺼리를 줬을 뿐이에요. 당신은 이미 이 익스포터가
     하찮은 일에도 법썩대는 그러한 친구란걸 알지 않나요? ^ㅅ^


 D. With the Sequence01 object selected, click on the open Curve Editor tool top button. It is located to
     the left of the schmatic view tool top button. In the left view pane of the Track View, click the plus   box  to open the details of the Sequence01 object. Now look down and do the same thing to open up the
    Object(Sequence) node. Left click on the Sequence Begin/End and click the Add Keys tool tip button located near the top of the Track View window. Add the first key at Frame 0, or where you started your  animation. Then add the second and final key at the last frame of your animation. Set these keys at
    the 0 value line.

 D. 시퀀스01 오브젝트가 선택된 상태에서, 커브에디터를 여세요. 이 버튼은 스케마틱 뷰의 왼쪽에 있습
    니다. 트랙뷰의 왼쪽에서 박스열시를 누르셔서 시퀀스 오브젝트의 하부항목을 여세요. 아래를 보시고
    방금 한것과 똑같이 해서 Object(sequence)의 하부항목을 여세요. 시퀀스의 시작/끝 항목을 클릭하시
    고  트랙뷰 윈도우의 맨 위 근처에 있는 '키추가' 버튼을 눌러 , 0프레임이나 애니메이션이 시작되는
   부분에 키를 주세요. 그리고는 애니메이션의 마지막에 두번째이자 마지막인 키를 주세요.
   이러한 키들은 그 값이 0인 라인에 있도록 하게 설정합니다.


 E. To review: We opened our default Max file, saved it in a new directory, made a .cfg for that directory
     and new Max file, deleted the model mesh, created a full body run sequence animation, add the
     Sequence01 helper node, set the keys for the start and end of the animation, and now ...
     Finally ....  we are ready to EXPORT!!!!!


 E. 다시봅시다. 메인모델의 맥스파일을 열고, 새로운 디렉토리에 그것을 새로 저장하고, 컨피그 파일을
   만들고, 모델메쉬를 지우고, full body naimation을 만들고, 시퀀스 더미를 추가해주고 애니메이션의
   시작과 끝에 키를 줬습니다. 자 그럼 .....    마침내!!!!   익스포트 할 준비가 되었습니다!!!


 F. Go back to your Utility tab; DTS Exporter Utility button and click the export Sequence button. Save this . DSQ file in the same directory as your main .DTS file. You will also want any texture, etc. that your
      model will need in this folder as well. If you have ShowToolPro which Highly recommend, then load
     it up, and check out what you have so far. If you click the load DTS and CS button you should see
     your model in it's root position, then selecting the run thread should result in your model running!
     I also threw in a .cs player file for ya below.

 F. 유틸리티 탭으로 돌아가서, 익스포터를 선택한 뒤, export sequence 버튼을 누르세요. 이 dsq 파일을
     메인 dts 파일이 있는 곳에 저장하세요. 텍스쳐도 필요할텐데, 이 폴더에 같이 두세요. 강력히 추천하
     는 ShowToolPro 가 있다면, 불러와보시고 여태 해온 것을 확인해보세요. load DTS and CS 버튼을
     누르시면 당신의 모델이 뉴트럴 포즈로 서있는 것을 볼 수 있어야 하며, run 애니메이션을 불러와보면
     뛰는 것이 보여야 합니다. 아래에 cs 파일도 제공합니다.


사용자 삽입 이미지

This video contains:
Full body animation overview               몸전체 애니메이션(.....)의 작업전반부
 1.sequence helper creation              시퀀스더미 만들기
 2. .max file setup for full body dsq export            dsq파일을 익스포트 하기 위한 맥스파일의 셋업

.cs player file overview     플레이어 스크립트 파일의 전반부
 1.how to setup the player.cs file       플레이어 스크립트파일 셋업하기
 2.general walkthru of the process      전반적인 작업의 흐름 

process overview      작업흐름
 1.general overview of the setup     셋업작업의 전반적인 흐름

Posted by 夢現 和
:
이 튜토리얼의 원 저작권은 www.smdlabs.com 에 있습니다.

3DSMAX DTS/DSQ Export


cfgFileSetup::

DTS/DSQ and Max file orgarnization and setup


컨피그파일 셋업

DTS/DSQ/Max파일의 구성과 셋업


Overview : Ok. before we go further, it's time to talk about orgarnization! No, don't worry about your messy
 work area just yet, but do pay attention to how you orgarnize your files and folders for your test DTS/DSQ
 setup project. Those .cfg files can creep up on you, and deliver hours of frustration until you figure it out!

전반적인 이해: 자, 더 앞으로 나아가기 전에, 구성에 관한 이야기를 해야겠습니다. 오 아녜요, 짜증날 것 같은
 작업에 대해 미리부터 걱정하지 마세요. 하지만 DTS/DTQ 의 테스트를 위한 파일과 폴더들의 구성에 대해
 관심을 가져보세요. 이러한 cfg 파일은 당신을 괴롭히고, 좌절의 시간들을 안겨줄겁니다. 당신이 cfg파일에 대해
  알아낼 때 까지.


The main DTS file will contain the models root pose at frame 0 followed by the standard outstretched arms
 pose int frame 1. Although the outstretched arm frame 1 pose is not required, it doesn't hurt to have it
 around for maint. The Whole Shape exported DTS file will contain the bone structure and skin weighting,
 as well as the UV map and texture map information if you have added that to your mesh. The Sequence
 exported DSQ files only contain bone offset, animation types, etc. So, do you have the overview etched
 into your brain?  Good, here we go.

메인 dts 모델은 0프레임에 모델의 기본 뉴트럴포즈를 취하고 있어야 하며, 1 프레임에는 양손을 쭉 뻗은, 그러한
 기본포즈를 취하고 있어야 합니다. 1프레임의 이러한 포즈는 필요하지 않을 수도 있습니다. 모든걸 익스포트한
 dts 파일에는 뼈의 구조와, 스킨웨이트 값과, 그리고 당신이 원한다면 추가했을 텍스쳐맵과 UV좌표를 가지고
있습니다. 시퀀스를 익스포트한 dsq파일에는 오직 본의 초기값과, 애니메이션의 타입, 등의 정보만 담고 있습니다. 자, 작업의 전반부가 머리에 새겨지셨나요? 좋습니다. 가보죠.


사용자 삽입 이미지

 1. Lets start by creating the main DTS model file. First backup and save your Max file this far. Copy it, and
   call it something like 'mainModelDTSfile.max' or something. You can save this file in your Scene folder in
   Max if you want. I created  a 'robot' folder inside the Scene folder of 3dsMax. Inside that folder was my
   default.cfg file for my main DTS export, and my mainModelDTSFile.max file.

  1. 메인이 될 DTS 파일을 생성하는 것 부터 시작해봅시다. 첫번째로, 당신의 맥스파일을 시작하기 전에 백업,
    그리고 저장해두세요. 그리고 그것을 복사해서, 'mainModelDTSfile.max' 이라고 부르던 뭐라 상관없이 명명
    합니다. 원한다면 맥스안의 scene 폴더 안에 저장하세요. 저는 맥스의 scene 폴더 안에 robot 이라는 폴더를
    만들었습니다. 그 안에는 메인의 dts 익스포터와 'mainModelDTSfile.max' 를 위한  default.cfg 라는 컨피그
   파일이 있습니다.


  A. This mainModelDTSFile.max should have everything we have done so far, plus : At Frame 0 add
     the Root pose for your model. (See screen shot above)

  A. 이 메인맥스파일에는 여태 작업해온 것들이 포함되어 있어야 하며, 추가로 - 0 프레임에 당신 모델의 뉴트럴
     포즈를 추가해주세요. ( 스샷 참고)


  B. You should still have the mesh, bones, skin modifier, eye, mount0, camara, and schematic setup that
     we just finished doing in your scene. Note : There is NO sequence dummy object yet! That will come in
     just a minute.

  B. 맥스파일 안에는 여전히 메쉬, 본, 스킨변형자, eye,mount0과 같은 더미노드들, 그리고 막 끝낸 스케마틱
     셋업이 포함되어 있어야 합니다. 주의점 - 아직 시퀀스 더미노드는 없습니다. 곧 나옵니다.


  C. The Exporter looks in the folder where your current Max file is located and should fine one .cfg file.
     Since we are creating the main DTS file we will want everything we have created so far in export, minus
     the root Bip01 object. FYI : The root Bip01 bone node has a screwed up pivot axis that is a parent to the correct pelvis node pivot axis. If you fail to NeverExport : the Bip01 node , then it will be used instead of the correct pelvis axit pivot, and your model will be facing sideways in the game instead of stright ahead
    See screen shots below for a sample main DTS object. cfg file setup file.

   C. 익스포터는 당신의 맥스파일이 위치한 폴더에서 컨피그 파일을 찾습니다. bip01 뿌리노드를 제외한 우리가
      여태 만들어온 것들은 모두 익스포트 되어야 합니다. - 당신을 위해 : bip01 뿌리노드는 꼬인 피봇정보를
      가지고 있으며 이 노드는 제대로된 피봇정보를 가지고 있는 골반노드의 상위노드입니다.  만약 bip01 뿌리
      노드를 익스포트 해버린다면,  골반노드의 피봇정보 대신 bip01의 피봇정보를 사용하게 될 것이며, 결국
     당신의 모델은 똑바로 바라보고 있지 않고 엉뚱한 면을 바라보고 있게 될 겁니다. 위에 있는 예제 스샷을 보시
     고, 컨피그 파일도 살펴보세요.


  D. Now go to your utility tab ; DTS Exporter Utility button and click the export Whole Shape button. Save the  file in a folder located next to the standard Players folder in your game directory. See screen shots.

  D . 유틸리티 탭으로 가세요. DTS Exporter Utility 버튼을 누르시고, Whole Shape 버튼을 누르셔서 게임
      디렉토리의 옆에 위치한 standard Player 폴더에 익스포트 결과물을 저장하세요. 아래의 스샷을 보죠.


사용자 삽입 이미지
 
 2. Now let's finally talk about exporting the indivisual DSQ files for each animation thread. There is good
   documentation on the differences between blend and non-blend animation, so for now we are just going
   to cover how to actually export each one. "NOTE" : Don't adjust the standard Max 30frames per second
   setting, or start scaling time. I noticed crashing when I played around with it, so I thought I would pass
   that aling. I also noticed some crashes and failed exports when I played with the frame rate setting on the
   Sequences dummy node also. so I would not play with that one either. You can control the speed of your
   animation just fine with the default settings. Example: 10 frame animation is fast, 100 frame animation is
   slow. etc.


2. 자 그럼 드디어 각 애니메이션을 dsq파일로 익스포트 하는 것에 대하여 이야기해보지요. blend 애니메이션과
   non- blend 애니메이션의 차이에 대해서 이야기한 좋은 문서가 있으므로, 우리는 단지 그것들을 어떻게 뽑아
   내는지에 대해서만 이야기할 겁니다. "주의" : 맥스의 기본설정인 1초에 30프레임 이란 단위를 조절하거나
   건드리지 마세요. 그런 것들을 건드렸을 때 뻑났습니다. 그래서 이런 부분은 안건드릴 겁니다. 또한 시퀀스
   더미에 있는 프레임 비율을 건드렸을 때도 뻑나는걸 경험했습니다. 이런 부분도 안만집니다. 맥스의 기본 시간
   설정으로 애니메이션의 속도를 컨트롤 하는 것으로 충분합니다. 예 ) - 10프레임 애니메이션은 빠르고,100프레
   임 애니메이션은 깁니다.


  A. Ok, from within this 'robot' folder located inside the 3dsMax scenes folder I created new folders
      describing different actions. For example; 'forward' , 'back', 'root', 'look', etc. Inside each of these
      folders is a Max file that started out as a copied mainModelDTSFile.max file. Then I added ONE and
     only one.cfg file for each of these action folders. See screen shots below.

  A. 자, 맥스의 scene 폴더 안의 robot 폴더 안에, 저는 동작을 묘사한 각각의 폴더를 만들었습니다. 예를 들어
     '앞으로', '뒤로', '기본', '보다' 이렇게요. 그리고 각각의 폴더에 mainModelDTSFile.max 파일을 복사해서
     넣었습니다. 그리고 또한 각각의 폴더에 컨피그 파일을 넣어주었구요. 스크린샷을 보죠.

사용자 삽입 이미지

This video contains: 영상에 담긴내용
 
.max file directory structure         맥스파일의 폴더 구조
1. an example project directory structure           프로젝트 디렉토리 구조의 예
2. overview of file organization          파일조직의 전반부

.cfg file and dsq sequence         컨피그 파일과 dsq 시퀀스
1.how to setup different . cfg files for dsq export.      다른 dsq파일을 위한 각각의 컨피그파일의 셋업
2.the difference between full and partial export files    애니메이션의 전체/부분 익스포트의 차이점


process overview  작업진행 전반부
1. general overview of .cfg file setup for animated sequence  애니메이션된 시퀀스의 컨피그파일 셋업 전반부


영상 - http://torque.smdlabs.com/media/freeTutorials/maxdts/page4.htm

Posted by 夢現 和
:
이 튜토리얼의 원 저작권은 www.smdlabs.com 에 있습니다.

3DSMAX DTS/DSQ Export


Schematic View::


스케마틱 뷰

5.Schematic view. This was one of the main reasons I sat down to write this quide! It took a solid evening
 to get this part to work, and the solution was so easy I thought I better leave a guide for others. I know I
 would have enjoyed sitting down to read this before I got started, as it would have saved me some time
 and frustration. This only covers animated DTS models with separate DSQ files. The static shape
 schematic setups are pretty well documented. That's what got me in trouble ...  I was trying to use a static
 model schematic to work for an animated one. No worky!

 5. 스케마틱 뷰. 제가 이 가이드를 쓰게 된 주된 요인입니다. 이 작업을 하며 고된 밤을 보냈고, 해결책은 생각
   보다 쉬워서, 저는 제가 알아낸 것들 다른 사람을 위해 남기는 것이 좋겠다고 생각했습니다. 저도 제가 작업에
   착수하기 전에 앉아서 이런걸 읽었다면 시간도 아끼고, 덜 고생했을 거라는걸 압니다. 이것은 오직 분리된 dsq
   파일을 가진 애니메이션된 DST 모델에 한정하고 있습니다. 정적인 오브젝트의 스케마틱뷰의 셋업은 잘 문서화
   되어있습니다  .....  이게 절 곤란하게 만든 겁니다. 저는 정적인 모델의 스케마틱 뷰 셋팅을 애니메이션된
   오브젝트의 스케마틱 뷰의 셋팅에 쓰려고 한겁니다.
   
   작업이 될리가 있나!!!!!  -_-;    ( 불쌍해지려합니다)


  A. Examine the screen shots below. With an animated DTS/DSQ setup you only need a few items.
    The details1 dummy object is attached to the Bip01 root node. All other details markers, etc are also
    attached to this Bip01 root node. You can attach eye nodes and mount point to the actual bones. For
    example : Attack the mount1 dummy object to the models right hand bones, etc.

  A. 아래에 있는 스크린샷을 주의깊게 보세요. 애니메이션된 DTS/DSQ 파일 셋업에는 단지 몇개의 아이템이
     필요할 뿐입니다.  deteil1 더미는 bip01 뿌리 노드에 연결시킵니다. 모든 이외의 detail 마커나 기타 노드 역시
     bip01 뿌리노드에 연결되어 있습니다. eye 노드와 mount 노드는 특정 본에 연결해주면 됩니다. 예를 들어 :
     mount1 더미는 모델의 오른손 bone에 연결합니다.


  B. I know what you're thinking ...  what about the Sequence dummy node? Don't worry about it just yet.
    First we are going to focus on saving our main DTS object file. Also, If you don't want your eye, camera
    even mount affected by the biped movement, then create a Dummy link called 'separate' or something.
    Attach the dummy 'seperate' node to the Bip01 node via the Schematic view. then attack the eye, cam,
    etc. notes to the 'seperate' node.

  B. 무슨 생각을 하는지 압니다.  ...   시퀀스더미 노드는 어디에 있죠? 아직 걱정하지 마세요. 첫번째로 우리의
     메인 DTS 오브젝트를 저장하는 것 부터 촛점을 맞춥시다. 또한, 만약 당신이 eye나 cam  등의 노드가
      바이패드의 움직임에 영향받지 않게 하고싶다면, '분리된 더미' 혹은 뭐라 부르던간에 그런 더미를 만드세요.
     그리고 그러한 노드를 통해 eye나 cam 노드를 bip01 노드에 연결시키세요.  

사용자 삽입 이미지


만약 당신이 맥스의 본을 사용한다면, 본의 이름을 알아두세요.  연결되는 숫자는 익스포터를 헷갈리게 만들 수
있습니다. 본의 이름을 다시 짓거나, 본의 뿌리노드를 base01 노드에 연결하는게 좋을겁니다.

또한, 캐릭터의 메쉬 뒤에 붙어있는 숫자와 detail 뒤에 있는 숫자는 일치해야 합니다.
사용자 삽입 이미지

This video contains:           영상에 담긴것
 Schematic view inside 3dsMax      맥스에서의 스케마틱 뷰
  1.how to setup the schematic view hierarchy for a base DTS shape that will also have DSQ sequences.
        DSQ 시퀀스를 가지고 있는 기본적인 DTS 오브젝트의 스케마틱 뷰에서의 계층구조 셋업
 
Overview of DTS and DSQ    DTS와 DSQ의 전반부
  1.discuss the differences in the schmatic view between a DTS and DSQ export
        스케마틱 뷰에서 DTS와 DSQ의 익스포트에 대한 차이점
 
 Detail1 helper node          Detail 헬퍼노드
  1.how to create the node        노드 생성하기


영상은 - http://torque.smdlabs.com/media/freeTutorials/maxdts/page3.htm


Posted by 夢現 和
:

이 튜토리얼의 원 저작권은 www.smdlabs.com 에 있습니다.

3DSMAX DTS/DSQ Export


Introduction::

 As with most things Torque related, the information is out there, you just need to find it!  As I blindly
stumbled my way through the animation pipeline I thought I would record the highlights of what I found,
some pitfalls to avoid, and of course how in the heck to get that animated model into Torque!

 This is not an all inclusive guide, but serves to clarify some fuzzy points.

소개::
 
 토크와 관련된 대부분의 정보는 저 밖에 있습니다. 당신은 단지 그것을 찾아내기만 하면 됩니다. 제가 장님마냥
고생하며 애니메이션 작업과정을 공부하며, 제가 찾아낸 핵심들, 피해야 할 몇몇의 함정들, 그리고 애니메이션 된
 모델을 토크에 띄우는 과정까지의 핵심들을 기록해야 겠다고 생각했습니다.

 이것은 모든 것을 포함한 가이드는 아니지만, 흐릿한 부분들을 명확하게는 해줄 겁니다.


Before we get started with an overview of the pipeline, lets talk briefly about the exporter tools. The 'Max2DTS' exporter like many tools that surround the TGE platform were created initially to be used

'in house' by the guys who made it. The exporter in not idiot proof and will fall apart if you're not nice to
 it!  If programming in not your forte, then some insight here is in order. In house tools are generally created
rapidly to do a very specific task so that the project can move forward.


작업흐름의 전반적인 것에 대해 이야기하기 전에, 익스포터 툴에 대해 간략하게 이야기해봅시다. TGE 플랫폼
주위에 있는 많은 도구들처럼, Max2DTS 익스포터는 애초에 '조직 내부적으로 ' 사용되기 위한 목적으로
몇몇의 사람들에 의해 만들어졌습니다. 익스포터는 쉽게 다룰 수 있게 만들어진 도구가 아니며, 당신이 제대로
하지 않는다면 제대로 쓰지 못할겁니다. 만약 당신이 프로그래밍을 잘 할줄 모른다면, 약간의 도움이 이제 나옵니다. 보통 내부적으로 쓰이는 도구는 아주 특정한 작업을 하기 위해 빠르게 만들어지며, 그렇기 때문에 프로젝트를
 돌리게 됩니다.


 Time was not initially spent trying to catch and deal with all the weird things someone else might do. Much
like an artists palette, it was not designed to be pretty or a finished work, but merely a tool to finish the job
at hand. Keep that thought in your mind as we walk through the steps involved in getting your models into
Torque. If you are getting an error or something is not working for you during export ; remember that these
tools have been used for a while and do work if you use them correctly. Pay attention to exactly what your
doing, and order you are doing it in and you should be fine.

시간이란 누군가가 저지를 수 있는 이상한 일을 찾아내거나, 조절하는데에 소비되서는 안됩니다. 마치 예술가의
팔레트처럼, 이 도구는 예쁜 작업을 위한 만들어졌거나, 완성된 작업을 위해 만들어지지 않았으며, 단지 주어진
일을 끝내가기 위한 하나의 도구일 뿐입니다.  당신의 모델을 토크엔진에 띄우기까지의 단계적인 과정을 밟아
나가며, 이러한 것을 염두에 두시기 바랍니다. 익스포트중 에러가 발생하거나 뭔가 일이 잘못되더라도, 이 도구
는 한동안 사용되어져 왔으며, 제대로 사용한다면 잘 작동할 것이라는 것을 잊지마세요. 당신이 어떤 작업을 하고
있는지 주의를 집중하시고, 작업하는 순서에도 주의를 기울인다면 , 당신은 괜찮아 질겁니다.


 This guide assumes you are familiar with 3ds Max and have already exported a static model from Max
into the Torque Game Engine. If you have not done so, then start by reading the documentation about
exporting shapes and animation from the Garage Games Website. This guide was intended to assist
animators with a basic walk through of simple full motion and blend animation export. There is no discussion of LOD, Collision meshes, mount points, etc.


  가이드는 당신이 3dsMax와 친하며, 맥스에서 간단한 정적 모델을 익스포트해서 토크게임엔진에 넣어봤을
것을 가정하고 있습니다. 만약 당신이 그렇지 않다면, Garage Games Website  에서 오브젝트와 애니메이션의
익스포트에 대한 문서를 읽기를 바랍니다. 이 가이드는 간단한 풀 모션과 보정 애니메이션 익스포트의 기본적인
과정을 다뤄 애니메이터에게 유용하도록 작성되었습니다. 때문에 LOD나 충돌메쉬, mount에 관한 이야기는
없습니다.


 One last thought : START SIMPLE ! Don't start by creating a 5000 poly monster with ultra complicated bone weight, 400 bones and bump mapping. Instead, start by creating and exporting a low poly static test model first. Then, after you feel comfortable move up to simple bones animation, skin weighting and TGE import. Getting a simple model imported properly will give you somewhere to work from when your trying to figure why your complex game model is causing you to lose your hair early.


  마지막 한마디 : 간단하게 생각하세요!  범프맵과 400개의 본과 초 복잡한 웨이트값과 5000개의 폴리곤 수를
가진 몬스터로 시작하지 마세요. 대신, 테스트로 적은 폴리곤을 쓴 간단한 모델을 만들고, 익스포트 해보세요.
그리고 나서, 좀 편안해 지면 간단한 본 애니메이션과 간단한 스킨셋팅을 해보시고, TGE 모델을 불러와보세요.
간단한 모델을 맥스로 되불러와 보는 것은  복잡한 게임모델이 왜 당신의 머리카락을 빨리 빠지게 만들어버리는지 알 수 있게 해줄겁니다.


This video contains:          동영상에 포함된 것
Important information about pre-model setup and design 작업 전 해야 할 중요한 것들

 1.model size     모델의 사이즈
 2.proper facing    모델이 바라봐야 할 곳
 3.axis overview  축에 관한 이야기
 4.mesh type   폴리곤의 타입

Brief overview of the exporting process  간략한 익스포팅 작업의 과정
 1.where to start       어디서부터?
 2.things to avoid   피해야 할 것
 3.things to do   해야 할 것


영상을 해석하면 좋겠지만... 듣기는 더 딸립니다.

맥스의 용어에 대해서 알 만큼 친해져있고, 고등학교 수준의 영어실력으로  2번정도 보면
전부 이해가지는 않아도 도움될만한 것들이 있으니
http://torque.smdlabs.com/3dsmaxAnimationSetup.htm 요기로 들어가셔서 보는 것이 좋습니다.


Posted by 夢現 和
:
DTS FAQ 3dsMax


In Game Problems


Q) Why aren't my up and down (jumping) motions showing up?

A) You likely have your bounding box set to inherit z motion from the object that it is linked to. You will
    need to deactivate this in the Hierarchy tab. This will keep bounds from following your character as he
    jumps up or down. You will also want to increase the bounds size to allow your character to jump
    without going outside of the bounding box.


Q) 왜 아래위로 움직이는(점프) 모션이 제대로 안보이죠?

A) 아마도 z축의 움직임을 링크시키지 않은 것 같습니다. Hierarchy 탭에서 이러한 것을 해제시킬 수 있습니다.
    이렇게 하면 바운딩박스가 당신의 캐릭터가 아래위로 움직일 때 따라다니도록 할 겁니다. 혹은 바운딩박스의
    크기를 키워서 캐릭터가 점프를 하여도 바운딩박스 안에서 되도록 할 수도 있습니다.


Q) Why are all of my objects facing the wrong direction when I bring them into my game?

A) The forward part of your object must point towards the positive Y axis in the top viewport in Max,
    rotate your model so that it points the right direction and export again.


Q) 제 오브젝트를 게임에 띄우면 잘못된 방향을 바라보고있죠?

A) 오브젝트의 정면은 맥스의 뷰포트에서 Y 플러스 축을 바라보고 있어야 합니다. 그러므로, 그렇게 되도록

    오브젝트를 회전시키고 다시 익스포트 하세요.


Q) The collision detection on my object is not working. Why?

A) All of your collision objects must be convex. If there is a concave part of the collision mesh, collision
    detection will not occur. You should also make certain that you have named your collision objects
    correctly and have added the necessary collision markers.


Q) 제 오브젝트의 충돌검출이 안됩니다. 왜그러죠?

A) 모든 충돌오브젝트는 튀어나와 있어야 합니다. 만약 충돌메쉬에 오목한 부분이 있다면 충돌검출이 되지 않습
    니다. 또한 충돌메쉬의 이름이 제대로 되어있어야 하며, 필요한 충돌 마커를 추가해줘야 합니다.


Q) Why can't I see my object's actions happening when I play a sequence in the game?

A) Make sure that your sequence is long enough to cover the length of time that an animation requires.
    Also make sure that you have named your sequene correctly so that it matches the correct sequence
    action within the Torque engine.


Q) 왜 게임에서 제 오브젝트의 애니메이션을 실행시켜도 볼 수 없죠?

A) 당신이 만든 애니메이션의 길이를 충분히 커버할 만큼의 시퀀스의 길이를 만들었는지 확인하세요.
   
    또한 당신의 시퀀스가 엔진에서의 시퀀스 이름과 맞는지도 확인하세요.


Q) Error: "Illegal transform animation detected between collapsed node '<name>' and bounds"

A) Your bounding box (bounds) is not enclosing your entire object at all times within the animation.
    Resize your bounding box so that it is always larger than your object ( at any time during any of the
    animations) and export again.


 Q) 에러 : (오브젝트이름) 노드와 충돌박스의 사이에 잘못된 변형애니메이션이 검출되었습니다.

 A) 당신의 충돌박스가 애니메이션 동안 충분히 오브젝트를 감싸지 못했습니다. 당신의 바운딩박스의 크기를

     조절해서 애니메이션의 어느 부분에서도 오브젝트를 감싸도록 충분히 크게 만드시고 다시 익스포트 하세요.


Q) When I load my character into the game it looks like I am viewing from his foot level. Why?

A) You either forgot to add an Eye or Cam dummy, the Eye and Cam dummy where omitted by the exporter
    (they were not on the always include list), or you forgot to move the dummys to the correct location on
    the model.

    The Eye and Mount nodes are getting culled out on export. If they are not in the DTS shape, they
    default to mounting at the pivot of the bounding box. Make sure the Eye and Mount nodes are included
    in your .cfg file for the DTS shape in the Always Export list.


Q) 게임에 캐릭터를 불러오면, 마치 발 근처에서 보고 있는 것 같습니다. 왜그렇죠?

A) 당신이 Eye 더미나 Cam 더미를 추가하는 것을 깜빡했거나, 혹은 익스포터에 의해 제외된 것 같습니다.

   ( 그것들은 언제나 익스포트 해야할 리스트에 있지 않습니다 ) 그렇지 않다면 모델의 더미노드들을 제 위치에

    놓지 않았을 겁니다.


    Eye더미와 Mount 더미 역시 익스포트시 제외될 수 있습니다. 만약 DTS 모델에 그 더미들이 없다면, 그것들은

    자동적으로 바운딩박스의 피봇 위치에 위치하게 됩니다. Eye더미와 mount 더미가 '언제나 추출' 리스트에

    있도록 컨피그 파일을 수정하세요.


Q) Why does my character rotate into the ground when I try to make it flip?

A) If you are using the bounds objects to do the rotation you will cause the character to rotate at the soles
    of his feet( instead of the hips or another location). This is because the pivot location of the bounds
    object in Max is the location of the ground in the Torque engine. When you try to rotate your character
    using the bounds object, you are actually rotating your character at a point near his feet causing the
    character to go into the ground.

    To get around this, either rotate an object that is at, or near, the character hip (this could be a mesh,
    a dummy, or a bone) , or do the animation inside of Max instead of programming it into engine


Q) 왜 제가 캐릭터를 flip 시키려고 하면 땅속으로 회전해버리죠?

A) 만약 당신이 바운드박스를 회전시켰다면 캐릭터가 발의 뒷꿈치 부분을 기준으로 회전해버릴겁니다.
  
    (엉덩이 부분이나 다른 부분을 중심으로 하는 대신에요)  왜냐하면 맥스에서 바운드박스의 피봇 회전은

    토크엔진에서의 지형의 회전이기 때문입니다. 만약 당신이 당신의 캐릭터를 회전시키기 위해 바운드박스를

    회전시킨다면, 실제로는 캐릭터의 발 근처를 중심으로 회전시키게 되는 것이므로, 캐릭터가 땅속으로

    회전해버리는 겁니다.


    이러한 상황을 극복하려면, 캐릭터의 엉덩이를 중심으로, 혹은 엉덩이 근처( 이런건 메쉬나 본, 더미가 되겠죠)
 
     를 중심으로 회전시키거나, 엔진에서 프로그램으로 돌리는 대신 맥스에서 애니메이션 시켜버리세요.


 Q) How can I make it easier to have sounds added to the actions of my character?

 A) Although your programmer would need to do the actual work implementation of this, you can help out
     in the processes of triggering a sound from an animation by putting a key and a key value in the
     trigger track of the sequence helper.


 Q) 캐릭터의 액션에 사운드를 추가하는 일을 어떻게 하면 보다 쉽게 할까요?
 
 A) 비록 프로그래머가 이러한 작업을 하기 위한 특정한 도구가 필요하다고 하더라도, 당신이 애니메이션의
 
     시퀀스 헬퍼의  '트리거 트랙'에 키와 키값을 줘서 사운드를 유발하도록 할 수도 있습니다.


 Q) Why when I load my model into the engine is everything I attach incorrectly oriented?

 A) This is likely a problem with how nodes such as mount0 are oriented. You need to remember that
     there are several coordinate systems within your 3D application and the default setting is typically
     view. This will display the model transform data to you based on the viewport that you are looking
     through.

    Switch the coordinate system to local and then look at your nodes. All of your nodes should have their
    Z axis facing up, and their Y axis pointing towards the direction that you wish to them to emit from.
    If they are not, you need to go into the Motion Command Panel, click on the affect pivot only button and
    then rotate the pivot point until it is oriented correctly.


  Q) 엔진에 모델을 불러오면 왜 제가 붙인 것들의 축이 잘못되어 있을까요?

  A) 이건 아마도 mount0같은 노드들의 기본축 문제일겁니다. 당신이 사용하고 있는 3d 프로그램은 몇가지의
   
      좌표 시스템을 가지고 있으며 기본 설정은 '지금보는 뷰' 라는걸 기억해야 합니다. 이것은 당신이 보고있는
 
      장면을 통해 모델의 변형정보를 보여준다는 뜻입니다.


      좌표시스템을 'local'로 바꾸고 노드들을 보세요. 모든 노드들의 Z축은 위를 바라보고 있어야 하며, Y축은

      당신이 원하는 앞쪽을 바라보고 있어야 합니다. 만약 그렇지 않다면, Motion Command 패널에 들어가셔서,
 
      'affect pivot only' 를 누르신 후 제대로 맞게 피봇을 회전시켜주세요.


 Q) Why won't objects sort correctly?

 A) The SORT function in the DTS exporter in made for little objects. You can force a SORT situation using
     your scene tree. The way models are assembled in the scene and how the heirchy is setup is Identical
     to how the object is assembled in the engine. Any body who has ever used a scene tree knows about
     parent -> child relationship. DTS uses this as well.

     For instance, if you are building a tree( foliage model) using a multi subobject material (1 trunk texture,
     1 or more foliage texture) , you would set your material with the solid texture first and the transparent
     textures second.

     This will force things to be built correctly in the Z-buffer. The object will be assembled in game the
     same way as the heirachy dictates, automatically sorting your transparent textured shapes. Any Model
     can be assembled this way no matter how complicated but it does require breaking your model up into
     smaller peices and setting up the heirachy correctly. This works for any modelling apllication that
     uses a scenetree.


 Q) 왜 제 오브젝트의 정렬이 잘 안되나요?

 A) DTS 익스포터의 정렬 기능은 작은 오브젝트를 위해 만들어져있습니다. SceneTree 를 사용해서 강제로
   
     정렬하게끔 만들 수 있습니다. 오븝젝트의 구성방법과 계층구조는 엔진에서 어떻게 구성되어 있는지, 어떤
   
     계층으로 되어있는지는 같습니다. SceneTree를 사용해본 사람이라면 자식과 부모에 관한 관계를 알겁니다.

     DTS도 이것을 사용합니다.


     예를 들어, 만약 당신이 하나의 줄기 텍스쳐와 또 하나의 잎사귀텍스쳐를 사용하여 다수로 이루어진 나무

     오브젝트를 만든다면, 당신은  첫번째로 딱딱한 텍스쳐를 첫번째로 사용하고, 투명한 텍스쳐를 두번째로 사용
   
     할 것입니다.


     이러한 것은 오브젝트를 Z버퍼 상에서 온전하게 구축되도록 합니다.  오브젝트는 게임상에서 계층구조가
 
     나타내는 그대로 만들어지며, 투명한 텍스쳐를 자동적으로 정렬합니다. 어떠한 모델도 이렇나 방법으로
 
     만들어지며 얼마나 복잡한지는 중요하지 않습니다만, 단지 당신의 모델을 작은 조각으로 쪼개고, 계층구조

     를 확실하게 만들어주는 것은 필요합니다. 이러한 작업은 SceneTree를 사용하는 모델링프로그램에서 모두

      같습니다.


 Q) Why won't some animation sequences apply to my DTS shape?

 A) For a sequence to be applied to a DTS shape, all of the skeletal nodes and all of the TGE nodes
     (such as eye, cam, mount, light, ski, etc) must match between the two files. If they do not, the engine
     will not allow your sequence to be applied.


 Q) 왜 어떤 시퀀스는 제 DTS 오브젝트에 불러와지지 않나요?
 
 A) DTS 오브젝트에 시퀀스 애니메이션이 적용되기 위해서는, 모든 뼈의 조각들과 TGE의 노드들(eye,cam 등)이

     두 파일간에 같아야 합니다. 만약 그렇지 않다면 엔진은 애니메이션이 적용되도록 놔두지 않을 겁니다.


 Q) Why does my shape look invisible?
 
 A) Check that you are viewing your model at the best LOD. Use the show LOD feature in Torque Show Tool
     in order to see if the smallest LOD shows your model. This is a problem that happens when your LOD is
     setup badly in Max. If you think you can see him and know the model is present because the shadow
    is cast, or Torque has no problems loading it and manipulating it in -game- You should check your LODs

 Q) 왜 제 오브젝트가 투명하게 보이죠?

 A) 현재 보고있는 장면이 최고의 레벨인지 확인하세요. 뷰어에서 LOD feature를 확인해서 가장 하위레벨의

      오브젝트가 보이고있는게 아닌지 확인하세요. 이러한 문제는 당신이 맥스에서 LOD의 셋업을 잘못했을 때

      일어납니다. 만약 당신이 작업을 제대로 했다고 생각하거나, 엔진에 트러블이 있는것이 아니라고 생각한다면

      당신 모델의 LOD를 확인해보세요.


 추가로   Miscellanious Problems and Questions   라는 항목이 남아있으나 질문들이 별 쓸모없어 보여서 패스.

마지막으로 혹시나 이것을 볼 사람들에게 다시한번 언급하자면 ..


 전 영어가 짧습니다. (-_-b)
Posted by 夢現 和
:

DTS/FAQ/3ds Max FAQ


Exporting


Q)I have a maxscript/macroscript that "prepares" my model for exporting but it does not work?

A)The maxscript likely isnt building the correct structure (and linking) that is needed for a scene to successfully export to the DTS file format. Do not use the maxscript.


Q)익스포팅을 위한 맥스스크립트/마이크로스크립트가 있습니다, 그러나 왜 작동이 안되요?

A)그런 스크립트들은 토크엔진을 위한 정확한 링크구조를 만들어주지 않습니다. 쓰지마세요.


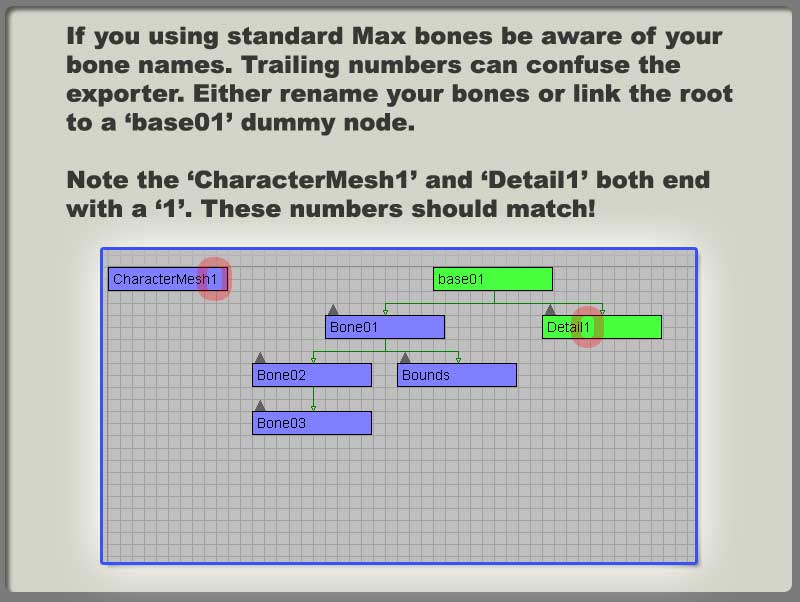
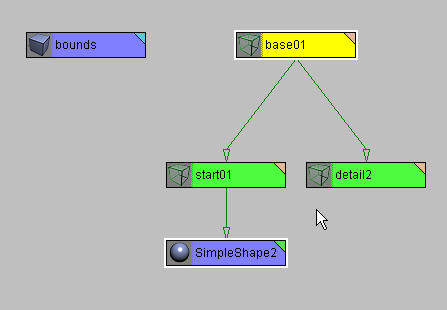
Q)Why won't my object's bounding box export?
A)Make sure the box is named bounds or it will not export properly.


Error: "Skin found on unlinked node "Cylinder01" -- skin must be unlinked"

Skinned objects should not be linked as a child to any other object in your scene. They should only be linked to other objects that are necessary
to make the skeletal deformation occur correctly. Unlink your skinned object from its parent. This can be done through the Schematic view or from the modifier list.


Error: “No Details to Export”
Either you do not have any objects in your scene that match the detail marker or you have setup your detail markers so that they are the parent of another object.
Make sure to have at least "Detail-1" and "Detail02" as a standard detail base.


Error: “More than one bounds node found”
Ensure that the bounds object is not the parent of any other objects.

Try to ensure that your objects heirarchy in the schematic view is similar to the example found in the DTS Exporter Tutorial or in the sample Max files.

Do an unhide all and check to ensure that you have not created duplicate bounding boxes that you hid from view.


Q)왜 제 오브젝트의 바운딩박스가 익스포트 되지 않죠?

A)박스의 이름이 bounds 로 되어있는지 확인하시고, 그렇지 않다면 제대로 추출되지 않습니다.

 Error: 연결되지 않은 노드에 스킨이 발견되었습니다. -
 
        스킨에 연결된 오브젝트는 어떤 노드의 하위오브젝트가 되면 안됩니다.

        이러한 오브젝트는 오직 사람뼈의 구조로 움직이는 오브젝트가 제대로 움직이기 위한 오브젝트와만
 
         연결될 수 있습니다. 스킨이 적용된 오브젝트의 연결을 해제시키세요.


 Error: 익스포트할 detail이 없습니다.

        디테일마커와 번호가 일치하는 오브젝트가 하나도 없거나, 당신이 디테일마커를 어떤 오브젝트의

        상위구조로 링크시켰을 경우입니다.  최소한 detail-1 과 detail02가 기본적인 베이스 디테일이 되도록
 
         하시기 바랍니다.

        (잘 이해 안감. )


Error : 하나 이상의 bounds 노드가 발견되었습니다.

          bounds 노드가 어떤 오브젝트의 상위구조가 아닌 것을 확실히 해 주세요.

          당신의 오브젝트의 schematic view 에서의 계층구조가  익스포터 튜토리얼에서의 장면과 유사하거나
 
          샘플맥스파일과 유사하도록 해보세요.

          '숨겨진것 모두 보이기' 를  하셔서 장면에서 보이지 않았던 사본 bounds 가 있지는 않은지

          확인해보세요.      


Q) Can my IK Solvers export into the DTS file format or do I need to set them as 'always ignore' in
    my  .cfg file?

A) You can do either , but you don't need them to make your model work. On export, the animation is baked
    down into rotation values on the bones. It would be better to cull them out so you don't have a bunch of
    extra nodes floating around that need to be transformed in the engine.


Q) 제가 설정한 IK Solver를 DTS 파일에 익스포트할 수 있나요? 아니면 제가 컨피그 파일에 그러한 것들을
    '언제나 무시하기' 로 설정해놓아야 하나요?

A) 둘 다 가능합니다만, 당신의 모델이 작동하기 위해서 그렇게까지 할 필요는 없습니다. 익스포트 시에는,
       
     애니메이션은 본의 회전값으로 '(...)'됩니다.  그것들을 추려내서, 엔진에서 변형되어야 할 필요가 있는
   
     노드들을 가지지 않는 것이 좋습니다. 

    (IK 솔버를 사용해보지 않았음으로 해석이 이상해도 패스) ( ... )


     Error : 'Too many subtrees : t2Autodetail only works with single subtree objects'
     You are linking objects to more than one subtree. Don't.

     Error : 하위트리가 너무 많습니다. t2Autodetail이 하나의 서브트리에만 연결되어 있습니다.
     당신은 오브젝트를 하나 이상의 서브트리에 연결했습니다. 그러지 마세요.


Q) I resaved player.max in MAX4. Will the original dsq files work with the new dts?

A) The player.max file has had the animation sequences stipped out of it, therefore you cannot re-export
    and get the default player.dsq file.

     The DSQ files are loaded into a new shape at runtime constructed by a .cs file that is associated with
     the shape. If you are exporting the shape and it doesn't have a .cs file, the animation won't load.
     If you don't have the proper .cfg file, for the DTS shape when you exported it, it probably missing nodes
     that are in the DSQ file, and the animations won't load into the shape. Look at the player.cs and
     dtsScene.cfg that is in the same directory as your player file.

     Or, there is no .cfg file, and collapse transforms was checked when you exported, so some of the
     nodes that the sequences need were culled.


Q) 제 플레이어 맥스파일을 다시 저장했습니다. 기존의 dsq파일이 새로운 dts 파일과 작동할까요?

A) player.max 파일은 추출한 애니메이션 시퀀스를 가지고 있었습니다. 그러므로 당신은 다시 익스포트 하지

    않고는 기본적인 player.dsq파일을 얻을 수 없습니다.


    dsq파일은 실시간으로 오브젝트와 관련어 구축된 cs파일(스크립트파일)로 인해 새로운 오브젝트에
   
    불러와집니다. 만약 당신이 오브젝트를 익스포트하고, 스크립트 파일이 없다면 애니메이션은 불러와지지

    않습니다. 만약 당신이 오브젝트를 익스포트 할 때 적절한 cfg파일(컨피그파일) 이 없다면, dsq파일에

    있어야 할 노드를 잃어버릴 것이며, 오브젝트는 애니메이션을 가지지 못할 겁니다.

    당신의 플레이어 파일이 있는 디렉토리 안에 있을 player.cs파일과 dtsScene.cfg 파일을 보도록 하세요.    


    혹은, 컨피그 파일이 없고, 익스포트 시에 'collapse transform'(변형 합치기) 가 체크되어 있었다면,
   
     시퀀스에 필요한 몇몇의 노드가 제외되었을 겁니다.


   Error : "multiple config files found in directory"
             The exporter looks for a file called <someone>.cfg in the same directory as the max file being
             exported. This .cfg file tells the exporter certain things about a model and allows for control of
             exactly what is being exported. The exporter expects one .cfg per model directory. If it finds more
              than one, it gives a warning.

   Error : 다수의 컨피그 파일이 발견되었습니다.

             익스포터는 익스포트 될 맥스파일이 있는 디렉토리에서 컨피그 파일을 찾습니다. 컨피그 파일은

             익스포터에게 모델에 관한것과 어떤 것이 익스포트 되어야 할지의 컨트롤을 말해줍니다. 익스포터는

             모델이 있는 디렉토리에서 하나의 컨피그 파일을 원합니다. 하나 이상이 발견되면, 경고를 할겁니다.


   The solution : make sure there is only one .cfg file in the directory you are exporting from. If you are
               exporting multiple versions of the same model or different animations, create subfolders for
               each animator and model, save your max file into this and use a different config file. This will
               allow you to only affect and work with the specific animation or version of your original model.

  해결책 : 당신이 익스포트할 폴더에 단 하나의 컨피그 파일만 존재하도록 하세요. 만약 당신이 하나의 모델에서
             
              각기 다른 버젼의 모델을 익스포트 하길 원하거나, 각기 다른 애니메이션을 익스포트 하고 싶다면,

             하위 폴더를 만들고 그 안에 원본모델을 저장하신 후, 각기 다른 컨피그 파일을 생성하세요. 이러한

              방법은 당신이 하나의 특정 모델만 가지고 작업을 할 수 있도록 해줍니다.


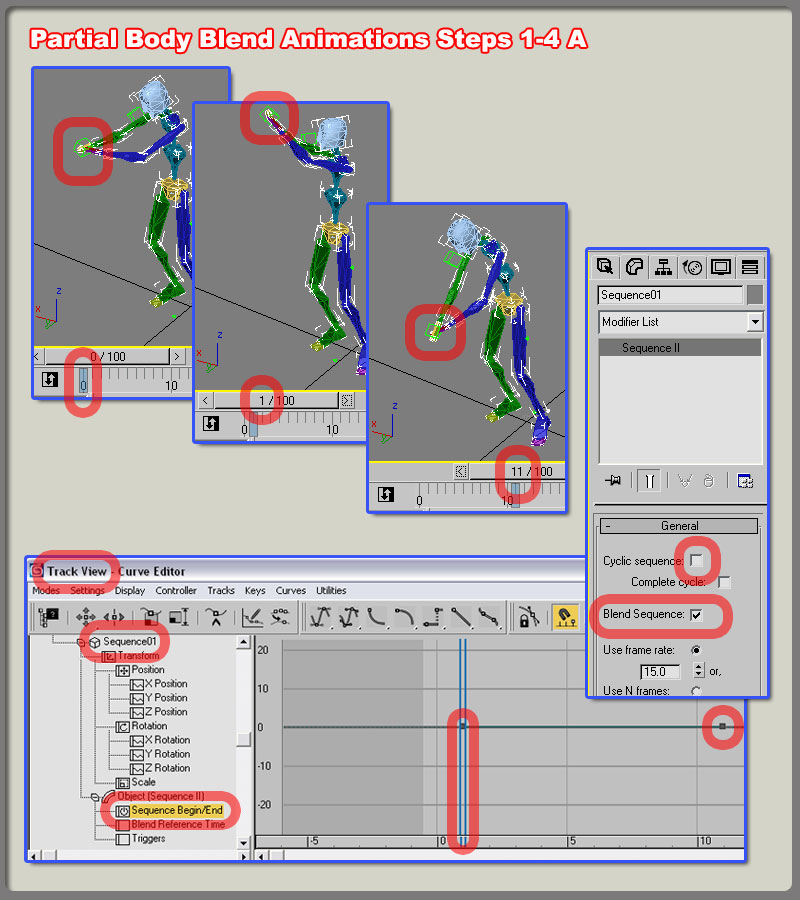
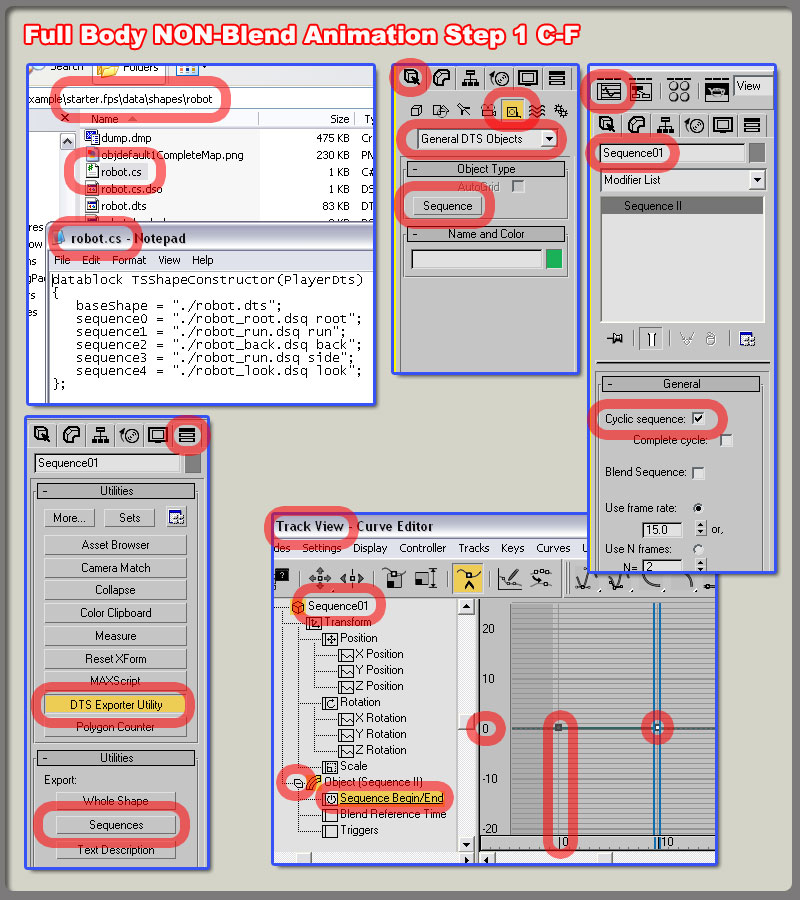
  Error : "Sequence " <name> " is missing keyframes to mark start and end"
            Open the track view window in Max. Expand Objects and scroll down the list until you find the
            sequence. Expand this track, then expand the sequence track below it. You will now see a
            track called sequence begin/end. Add a keyframe where the sequence will begin, and then
            add another one where you wish to have your sequence end.            

  Error : 'XX' 시퀀스가 시작과 끝을 알리는 마크의 키프레임을 잃어버렸습니다.

            맥스에서 트랙뷰 윈도우를 여시고, 오브젝트를 확장시켜 리스트에서 시퀀스를 찾으세요. 이 트랙을

            확장시키면 아래에 있는 시퀀스 트랙을 확장시키세요. 그럼 시퀀스 시작/끝 트랙을 볼 수 있을겁니다.

            시퀀스가 시작되는 부분에 키를 주시고, 시퀀스가 끝나길 원하는 부분에 또다른 키를 주세요.


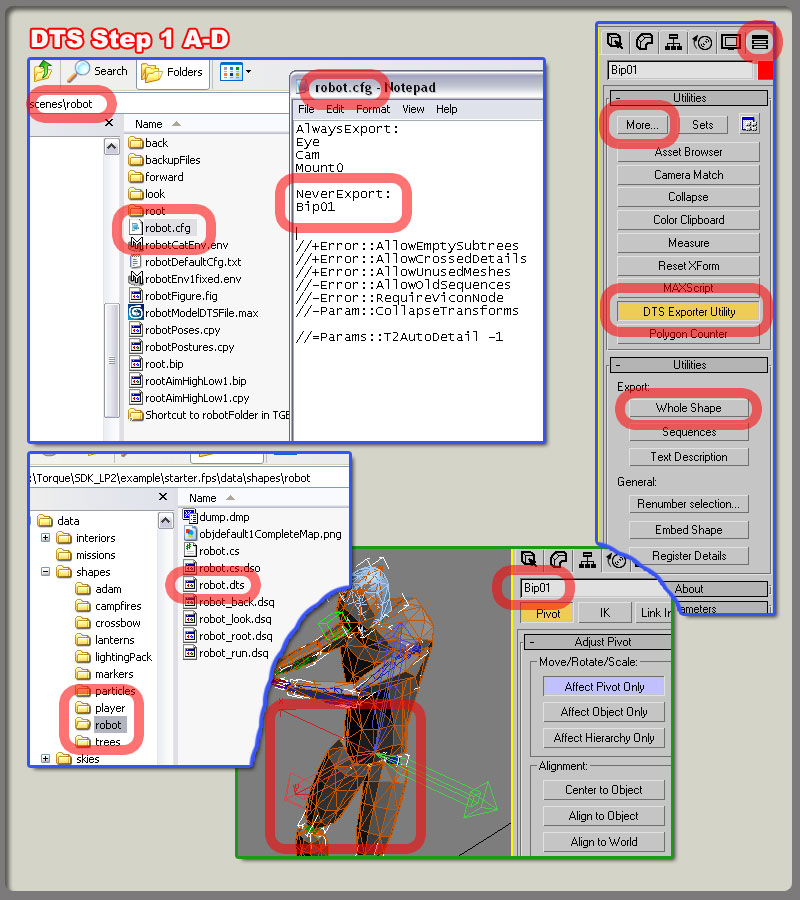
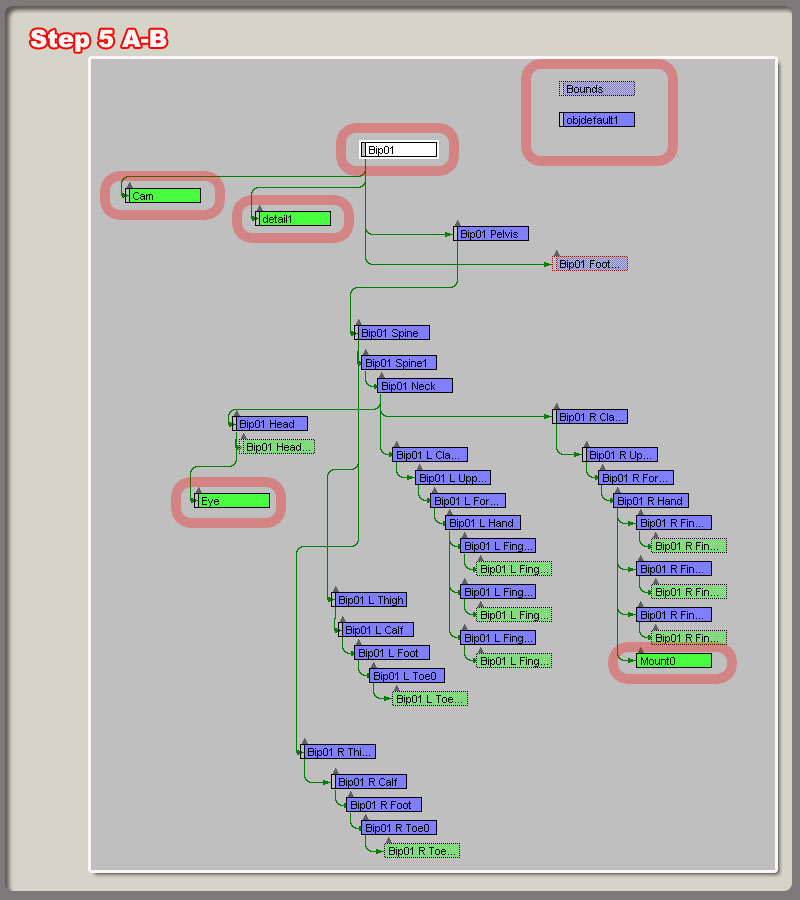
Q) What type of objects should by mount, collision, eye, cam, ground, and mass nodes be?

A) These nodes should all be dummy objects. If the exporter is ignoring these nodes when it exports,
    you need to explicitly list them in your .cfg file. See the Max2dts documentation for more information
    on .cfg files.

Q) mount, eye, cam, ground, mass 등의 노드는 어떤 타입의 오브젝트여야 하나요?

A) 이러한 노드들은 반드시 더미 오브젝트여야 합니다. 만약 익스포터가 이런 노드들을 무시한다면 당신의

    컨피그 파일에 반드시 추가해줘야 합니다. 더 자세한것은 Max2dts 문서의 컨피그 파일부분을 보세요.


 Error : "Assertion error on skin objects"
     You likely did not set up your envelopes and bone weighting corectyl. If these is even a single
     unassociated vertex on your mesh that has the skin modifier on it, it will cause an assertion error when
     you try to export.

     Or, collapse your model to an Editable Mesh before applying your skin modifier. Check your Dump file
     to see where the assertion error show up, it will reveal the last area the exporter was working on,
     typically the result will show which bone is not correctly skinned in.

     (I've seen this same error when trying to export a poly object with skin modifier on it. Only a mesh
      Object works for me. This is exporting from Max5. I've also notied this in the model section - XXX)


  Error : "스킨 오브젝트에 Assertion 에러가 있습니다."

      당신은 아마도 엔빌롭의 셋팅이나 본의 웨이트값을 적절하게 셋팅하지 않은 것 같습니다. 단 하나의

      점이라도 연결되지 않은 , 따로 노는 점이 있다면 익스포트 할 때 에러가 날 수 있습니다.


      혹은, 스킨을 적용하기 전에 모델을 editable mesh로 변환해주세요. dump 파일을 체크해보시고, 어디서

      에러가 났는지 찾아보시기 바랍니다. 익스포터가 작업하던 마지막이 어디인지 알 수 있으며,

      어떤 본이 제대로 연결되지 않았는지 찾아보세요.


   (누군가의 첨언)

   (스킨으로 연결된 폴리 오브젝트를 익스포트 하다가 같은 에러를 본적 있습니다. 맥스 5버젼이었으며, 메쉬만

     씁니다. model section 에도 이러한 내용을 추가했습니다.)


  Error : "Cannot collapse node "name " because it is a bone!"
         You are likely using your cfg file to never export a bone that is currently in your scene, this can
         cause an error because the exporter thinks that the mesh ( with Skin modifer) in your scene needs
         this bone to perform the deformation. Delete your mesh and then try exporting again.


  Error : 노드를 합칠수가 없어요, 왜냐면 그게 본이기 때문이래요
          당신은 아마도 컨피그파일에 당신의 장면에 있는 본을 익스포트 하지 않도록 해놓은 모양입니다.
          이것은 에러를 발생시킬 수 있는데 왜냐하면 익스포터는 스킨 모디파이어가 적용된 메쉬가  번형을 위해
          그 본이 필요하다고 생각할 수 있습니다. 메쉬를 지우고 다시 익스포트 해 보세요.


Q) My model exports correctly, so why are there problems with auto detail levels?

A) The good folks at Bravetree productions have created a small utility called unmessdts.exe ( found in
    DTS Exporter documentation) that will fix the autodetails that are created by the exporter when the
    Multres modifier is used. Information on how to use the unmessdts.exe file can be found in the DTS
    Exporter documentation.


Q)  제 모델은 잘 익스포트 되었는데, 그렇다면 왜 auto detail levels 쪽에 문제가 있나요?

A) Bravetree 프로덕션의 어떤 좋은 사람이 ( .... ) unmessdts.exe 라는 작은 툴을 만들었습니다. 이것은
   
    익스포터에 의해 Mulires가 적용된 캐릭터의 익스포트시 생성되는 autodetail 문제를 고쳐줍니다.
 
    사용법은 DTS 익스포터 문서를 참고하세요.


Q) Does the shape exporter work with Max 5?

A) Yes, but not officially. Discrete changed the Multires plugin in Max5. In order to get the exporter to
    work you need to backup your copy of the MultiRes DLM in Max5 and copy in the Multires DLM from
    Max4.


Q) 맥스 5에서도 익스포트 할 수 있나요?

A) 네 가능하지만 공식적으로는 아닙니다. 맥스회사는 5버젼에서 Multires 플러그인을 바꿨습니다. 때문에

    맥스5에 있는 Multires DLM 파일을 백업해두시고, 맥스4의 DLM파일이 있는 곳에 복사하세요.


Q) How do I scale my model and its bones?
A) Unfortunately there no easy answer to this question, the problem lies in the fact that you are scaling the
    bones that a modifier on your mesh is referencing to perform the deformations based on the bone
    transforms.

    To re-adjust your scale, you will need to do the following:
    1.Save your weighting for your deformation modifier to a file.
    2.Remove your deformation modifier from your model.  
    3.Scale the model and re-adjust the size of your biped to the correct size. 
      Note if you are using bones, they typically do not scale well. If you have any problems you will
      need to rebuild them.
    4.Reset the transform information on your geometry that you scaled(not biped or bones).
    5.Add your deformation modifier back onto your geometry. Add all of the biped of bones data that
       you need with it into the modifier.
    6.Load your weight table that you saved in the first step back into your modifier.


Q) 제 모델과 본의 사이즈를 어떻게 줄이나염? ( 또 나왔다...)
A) 불행하게도 이 질문에 쉬운 방법의 답은 없습니다. 왜냐하면 당신이 본의 크기를 줄인다면 , 메쉬에 적용된
    변형자(modifier) 는 변형을 일으키기 위해 본의 변형에도 영향을 받기 때문입니다.

    크기를 조절하기 위한다면, 이러한 단계를 거쳐보세요.
     1. 스킨값을 파일로 저장합니다.
     2. 모델에서 변형자(modifier)를 삭제하세요 ( skin이 되겠군요)
     3. 모델과 바이패드의 크기를 적절하게 조절하세요
         만약 바이패드가 아니라 본이라면, 잘 안될겁니다. 문제가 있다면 다시 해야할 겁니다.
     4. 오브젝트에 저장된 변형정보를 초기화시키세요. ( 바이패드나 본 말구요 ) ( reset Xform? )
     5. 변경자 목록에 원하는 변경자를 추가시키세요
     6. 첫번째 단계에서 저장했던 스킨값을 다시 불러옵니다.


Q) How can I export animations that I have done with a modifier in Max?

A) Any animation done with any modifier found in Max can be exported to a DTS file. To export this
   animation information you must flag the morph animaion option in the DTS Sequence object that you add
   to your scene, otherwise this information will not be exported.


Q) 맥스에서의 변형자를 사용한 애니메이션을  어떻게 익스포트 할 수 있을까요?

A) 맥스에서의 어떤 변형자를 사용한 어떤 애니메이션도 DTS파일로 추출될 수 있습니다. 이러한 애니메이션을
 
    익스포트 하고 싶다면 장면에 추가한 시퀀스 오브젝트에 'morph animation'을 체크해야 합니다. 그렇지 않으면

    익스포트 되지 않을겁니다.


Q) Why does my rotation animation look fine in max but stutter in the engine?

A) If you fail to match your start and end positions, TGE will reset the objects position to what it sees at
    the start of the sequence. This causes the jump of stutter effect that you see because the position that
    is moving to between two frames is completely different.
   
    In order to solve this problem set the end key frame of your object(s) animation to go 360 degrees
    (so that is loops correctly). If you liked the timing you had set, increase the end time of the animation,
    move your keys, and adjust them as previously mentioned. Don't forget to move your sequence
    start/end keys too.


 Q) 왜 제 오브젝트의 회전 애니메이션이 맥스에서는 잘 보이는데 엔진에서는 안그렇지요?

 A) 만약 당신 오브젝트의 시작과 끝을 잘 맞추지 못한다면, 엔진은 시퀀스의 시작부분으로 오브젝트의 위치
   
     값을 재설정 해버립니다. 이러한 것은 만약 오브젝트가 점프를 할 때 완전히 다른 두 프레임의 사이를

     움직이기 때문에 마치 버벅이는 효과를 보이게 됩니다.


     이러한 문제를 해결하는 또 다른 방법은, 오브젝트의 애니메이션의 끝에 360' 회전값을 줍니다.(그래서
 
     제대로 순환 되도록) . 당신이 설정한 키가 괜찮다면, 애니메이션의 종료 타이밍을 증가시켜 주고,  기존의
  
     키를 움직여서 전에 언급한대로 조절하세요. 시퀀스의 시작/종료 키를 조절해주는 것도 잊지 말구요.

    ( 문맥에는 어긋난 조잡한 해석이지만 대애충 무슨 소린지는 알겠음)


Q) Why is my weapon placed incorrectly on the mount node?

A) you probably do not have an accompanying mountpoing node in your weapon model DTS file. Without
    this node your weapon will be placed based on the location of the bounds shape.

    Either that, or your weapon script might be telling the weapon to be offset.


Q) 왜 제 무기가 mount노드에 제대로 위치하지 않죠?

A) 아마도 당신의 무기 DTS파일에 mountpoint 노드가 포함되지 않은 것 같습니다. 이것이 없다면 당신의 무기는
   
    가장 기본적인 위치에 놓여질 것입니다.

    또 하나의 가능성은, 무기오브젝트의 스크립트 파일이 무기의 설정을 offset 시킨 것 같습니다.


Q) Why after scaling my scene do all of my nodes seem to be placed in the wrong location?

A) When the exporter looks at your scene and reads the hepler, it finds that the helpers base position is
    in one location, but the scale is visually telling you that it is in another. Since scales are applied onto
    your 3D data (they do not actually change it) the exporter reads the original location and dumps that
    into the DTS shape.

    If this has happened to you, you will have to replace all of these helpers of find some way to undo your
    scale. A better solution , if it's available, would be to import the nodes from a previous version of the
    file ( before you scaled) and have them replace your existing ones.

    As a general rule you should never scale your dummy nodes.


Q) 왜 크기를 조절한 후 노드들이 제 위치에 있지 않을까요?

A) 익스포터가 장면을 보고 헬퍼를 읽은 후 ( 왠 헬퍼..) 헬퍼의 기본 위치는 같지만 , 당신의 눈에는 크기조절 후
   
    제 위치에 있지 않게 보일 겁니다. 스케일값은 3d 데이터의 전체에 영향을 미치며 (즉 헬퍼의 기본 위치는 바뀌

    지 않습니다) 익스포터는 DTS 파일 안에  있는 원본의 위치값과 dumps 값을 읽습니다.

   
    이러한 일이 발생한다면, 당신은 이전 작업으로 돌려 (undo) 이러한 더미들을 제 위치로 되돌려야 합니다.

    더 좋은 방법은, 만약 가능한다면, 크기 조절하기 이전의 DTS 파일을 불러와서(import)  더미들을 기존의

    더미들과 교체하는 것입니다.


     일반적으로는, 당신은 절대 더미 노드들의 크기를 조절하면 안됩니다.


Q) Why is the polygon count of my object higher in Torque than Max?

A) There are a few items that typically increase polygon count past what was displayed when you built
    your model in Max.

    The first is that your skeletal systems polygons that make up its shapes are included in the count that
    the Torque Game Engine gives you.

    The second is that when the exporter encounters a material with double-sided flagged, it actually
   exports two sets of polygons (the normal polygons that you see and then another set of flipped polygons)
   for the model/node that the material is applied upon. This in not something that should concern you or
   affect the performance of your TGE application. That is unless you made a large object use a double
   sided material. In that case, thousands of unnecessary polygons are being rendered.

    The third is that TGE will include all of your collision geometry in this total as well.


 Q) 왜 캐릭터의 폴리곤 수가 맥스에서보다 엔진에서 더 높죠?
 
 A) 당신이 맥스에서 만든 모델보다 폴리곤 카운트가 증가하는 요인이 몇가지 있습니다.

    첫째로, 당신의 뼈구조애니메이션 시스템이 추가하는 폴리곤이 엔진에서도 추가됩니다.

    둘째로, 익스포터가 두방향의 면으로 체크된 폴리곤의 숫자를 샐 때, 그것은 실제로 두개의 폴리곤으로

    인식합니다. (한면은 당신에게 보이는 면이고, 다른 한 면은 뒤집힌 면입니다.)

    이것은 당신이 작업할 때 신경써야 하거나, 엔진의 퍼포먼스를 떨어뜨리는 일은 아닙니다. 당신이 아주 큰

    오브젝트를 만드는 것이 아니라면 말이죠. 그러한 상황에서는, 불필요한 수천개의 폴리곤이 랜더링되어야

    하기 때문입니다.

    세번째로, 게임엔진이 당신이 만든 충돌박스를 추가하기 때문입니다.


 Q) My character export successfully so why does it look distorted int the ShowTool?

 A) You are probably forcing the Bip01 nodes to be exported in either your DTS or your DSQ which is
     causing odd transform data to be read by Torque and applied to your DTS shape. Change your CFG
     file that is used to export this model of sequence so that node Bip01 is "always ignore".


 Q) 제 캐릭터가 성공적으로 익스포트 되었는데 왜 뷰어에서 찌그러져 보일까요?
 
 A) 아마도 DTS파일이나 DSQ 파일에 Bip01 노드를 익스포트 하도록 강제한 것 같습니다. 이 Bip01 노드는

     토크엔진이 잘못된 변형데이터를 읽게 할 수 있습니다. 컨피그파일을 변경해서 Bip01 노드를 익스포트

     하지 않도록 'always ignore(언제나 무시하기) 로 해주세요.


Posted by 夢現 和
:

DTS/FAQ/3ds Max FAQ
Animating


Q)Can I use a dummy object to help control the motion of my bones?

A)Sure. Just make certain the dummy object(s) you are using does not have a number at the end of its name.
  This may cause problems with the exporter if the number happened to match a detail marker in your scene.


Q)제 본의 사용을 돕기위한 더미를 사용할 수 있나요?

A)물론입니다. 단지 당신이 사용할 더미의 이름 끝에 번호가 붙지 않도록 해주세요.
 
  만약 디테일마커와 번호가 같다면 익스포터가 문제를 일으킬 수 있거든요.


Q)Do I Need a Sequence Object?

A)Yes, a sequence object is required to export an animation.

  For information on how to use a sequence object, please consult the DTS Exporter Tutorial.


Q) 시퀀스 오브젝트가 필요한가요?

A) 네.시퀀스 오브젝트는 애니메이션을 익스포트하기 위해 필요합니다.
 
   시퀀스 오브젝트를 사용하기 위해서는, DTS 익스포터 튜토리얼을 참고해주세요.


Q)Can I use Footsteps from Character Studio to help move my model around?

A)You can if you like. The exporter should have no problems with Biped Footsteps.


Q)캐릭터스튜디오의 풋스텝을 사용해도 되나요?

A)원한다면 가능합니다. 익스포터는 바이패드 풋스텝과 아무런 문제가 없습니다.


Q)Is there any way I can take the pose that I have done on one side of my Biped or bones skeleton and copy it to the other side?

A)Yes. In figure mode on your biped object, you can select the objects that you wish to copy, press the copy transform button, and then click on your destination area of the biped

  and press paste opposite transform.

  There are numerous ways to do this with bones, the easiest though would be to go into your track view and copy the rotation track from one bone and then paste it onto another bone.

  Another way would be for you to copy and paste the specific rotation or position information from one bone to another via the type-in window for the Move and Rotate tools.

  You could also try to use one of the many maxscripts that are located on the web that can help automate this task for you. Scripts such as these are located at sites like maxplugins.de.

키의 복사이야기. 나중에
Q)

A)


Q)Can I translate the information contained in the Physique modifier into the Skin modifier?

A)Yes you can. On the Discreet development website (Spark's site) there is a small utility that Discreet has created that will turn Physique into Skin and vice versa.


Q)피직정보를 스킨정보로 옮길 수 있나요?

A)네 가능합니다. discreet 웹사이트에 피직데이터를 스킨데이터로 옮겨주는 작은 유틸이 있습니다.


Posted by 夢現 和
:

Introducton to the ShowTool

The showtool can be accessed by putting the argument - show when you launch the application. This can
be done from the command line, but it is easier(especially for artist types) to just add the switch into a
shortcut


쇼툴의 소개

- 구버젼의 쇼툴인듯하여 번역패스(...)

사용자 삽입 이미지


간략한 쇼우툴의 인터페이스
W - zoom in
S - zoom out
A - rotate left
D - rotate right
E - rotate camera up
C - rotate camera down
Z - rotate camera right
X - rotate camera left

...........이전 구버젼에서는 마우스 인터페이스를 지원하지 않았던건가, 전혀 먹질 않습니다.
현재 사용중인건 Torque ShowTool Pro 버젼 1.0 이라, 매칭되지 않습니다. 고로
관련없는 부분 역시 번역 패스.

추후 추가될 부분 -
simple shape with detail levels
detail level in the showtool
multiRes
collision objects
material and textures


Sequence Objects:

Sequence objects are necessary if animation is to be exported. The sequence object tell exporter how
to export animation data over a given range of time in 3DSMAX, and what to call the sequence.
A sequence object can be created like any other helper object found within 3DSMAX.

시퀀스 오브젝트.
시퀀스 오브젝트는 애니메이션을 추출할 때 필요합니다. 시퀀스 오븝젝트는 익스포터에게 3dsmax에서 설정된
시간의 애니메이션을 어떻게 추출할 것인지 , 그리고 어떻게 불러야 할 것인지 익스포터에게 알려줍니다.
시퀀스 오브젝트는 3dsmax에서 포함하는 어떤 헬퍼로던 생성할 수 있습니다.

사용자 삽입 이미지

This is done in the Create tab by clicking on the "Helpers" menu, and then using the pull down menu to
choose "General DTS Objects". See the section on the Sequence Object Parameters(found below) for
more details about sequence object.

헬퍼 메뉴를 선택하면 뜨는 생성 탭 장면입니다. 그리고 아래로 내려 'General DTS Object' 를 선택하세요.
더 자세한 것을 알고자 한다면 Sequence Object Parameter 파트를 보세요.


Sequence helpers that you place in the scene are unlinked objects that float unlinked in the world
(they do not need to be linked to anything)

화면에 위치한 시스템헬퍼는 어떤 것에도 연결될 필요가 없는 떠잇는 오브젝트입니다.


Simple Shape with Animation:
Open SimpleShape5.max locatted in the documentation file pack.
The shape has been animated. Note that only the highest level of tetail is animated, and the lower detail
levels are not.


애니메이션을 포함한 간단한 오브젝트:
simpleshape5.max 파일을 열어주세요.
오브젝트는 애니메이션이 되어있으며, 가장 상위 detail 레벨의 오브젝트만 애니메이션이 가능하며 하위레벨의
오브젝트들은 애니메이션 되지 않는 다는 것을 알아두세요.


Create a sequence helper. Name it SimpleAnimation. Open the trackview and fine the Track for SimpleAnimation. Now, using the create key button, add a keyframe at frame 0 in the 'Sequence Begin/End'
track. Put another one at frame 40.

시퀀스헬퍼를 생성합니다. SimpleAnimation이라 명명합니다. 트랙뷰를 여시고 SimpleAnimation 이라고 명명된
트랙을 찾으세요. 자, 키생성 버튼을 클릭하시고,  '시퀀스의 시작/끝' 이라 명명된 트랙의 0프레임에, 그리고
40프레임에 키를 추가합니다.


That is all that needs to be done. Export the shape and open it in the ShowTool. it will be animation when
you open it. Use the detail slider to go through the detail levels and notice that all the detail levels are
using the animation form the main detail level. The transforms of the lower detail levels have been discarded
and they are instead using the transform from the highest detail level.

이것들이 해야할 일의 다입니다. 오브젝트를 익스포트하고 뷰어에서 열어보세요. 열면 애니메이션이 될 것입니다
디테일 슬라이더를 조절해서 하위레벨로 옮아가보아도, 최상위레벨의 애니메이션 데이터를 참고하여 모두 같은
애니메이션이 되는 것을 확인할 수 있습니다. 하위레벨이 가지고있던 변화 정보는 제거되고, 대신에 최상위레벨의 애니메이션 데이터를 사용하게 됩니다.


Visibility:
The Torque Engine support animated visibility.
Visibility is controlled by an object's visibility track. A visibility track of on object can be created in the
Track View (consult your 3DSMAX documentation on how to do this).

토크엔진은 애니메이션의 보이기/보이지 않기 기능을 지원합니다. 이것은 오븝젝트의 보이기/보이지않기 트랙을
조절하여 가능합니다. 이러한 트랙은 트랙뷰에서 생성가능합니다.

If the value of the visibility property is 1 the item is visible, if it is 0 or less item is no visible. This much
is the same as before. But now as the value goes from 0 to 1 the shape will fade in. If you don't want the
object to fade in but go from visible to invisible all at once, then make sure visibility goes from 0 to 1
instantaneously.

만약 visibility 값이 1이면 오브젝트는 보입니다. 0이거나 0보다 낮다면 보이지 않습니다. 이러한 값의 양은
전과 같습니다. 그러나 0부터 1로 값이 변한다면 오브젝트는 서서히 사라질것입니다. 만약 당신이 오브젝트가
서서히 사라지는 것이 아니라 순식간에 보이는 상태에서 보이지 않게 되길 원한다면  수치의 값도 그렇게 되도록
조절하세요.


Visibility animation must be checked in the Export control parameters rollout.
이러한 가시 아니메이션은 반드시 익스포터의 파라메터에 체크를 해줘야합니다.


Simple Shape with Visibility Animation

Open SimpleShape6.max located int the documentation file pack.
Select the object and open the track view. Notice that it has a visibility track and that the track is animated
A value of 1.0 makes the object fully visible, and a value of 0.0 makes the object fully invisible
(intermediate values are allowed. A value of 0.5 will make the object 50% transparent.)

간단한 오브젝트의 가시 애니메이션

simpleshape6.max 파일을 어세요. 오브젝트를 선택하시고 트랙뷰를 여세요.
오브젝트가 가시트랙이 설정되어 있는지, 그리고 그 트랙이 애니메이션 되는지 확인하세요.
1의 수치는 오브젝트를 온전히 보이게 하고, 0의 값은 보이지 않게 합니다.
(중간의 값도 허용됩니다. 0.5의 수치는 50%의 가시도를 가집니다.)

Make sure 'Visibility Animation' is checked in the Sequence 'export control' rollout and export the shape.
When you check it in the showtool, you will notice that just like transform animation, the lower detail levels
have accquired the visibility animation.

'가시 애니메이션' 의 항목이 시퀀스의 export control에 체크되어 있는지 확인하고, 익스포트합니다.
뷰어에서도 체크를 하면, 마치 이전처럼, 하위단계의 디테일 오브젝트 역시 가시 애니메이션이 적용되는 것을
볼 수 있습니다.


일단 이 문서는 여기로 끝. TDN에서도 이 문선s OldDoc 이라고 명시하고 있으며,
실제로 이 문서에서 다루는 것은 맥스 3과 4버젼이며, 뷰어인 ShowTool 역시 버젼이 낮다.

게다가 가장 중요한 목적이었던 바이패드를 심은 캐릭터의 온전한 익스포팅, 컨트롤 포인트 등은
다루고 있지 않았으니...   


다른 문서를 찾아봐야겠다.


Posted by 夢現 和
:

1page에 이어.


A Simple Shape


you can use the SimpleShape.max in the file pack to follow along with.

동봉된 파일팩 안에 있는 SimpleShape.Max를 사용해도 됩니다.


From either the top, user, or perspective view, make a sphere with 16 sides. Make sure the shpere has
mapping coordinates by putting a check in the checkbox at the bottom of the creation panel.Align the sphere
to the center of the world using the transform type - in floater.(While in Move Mode, go to Tool. Transform Type-In) and enter 0 in all the boxes in "Absolute World". Name this shape "SimpleShape".

top뷰,user뷰,pespective 뷰의 어느 곳에서건 간단한 16면의 구를 만드세요. 크리에이션 패널의 하단부에
체크박스에 체크를 해서  맵핑 좌표를 생성하는 것을 확인하세요.
구를 월드 좌표의 중심에 정렬하세요. SimpleShape 라고 명명하세요.


Copy SimpleTexture.bmp from the file pack and put it in your export destination directory in the Torque project. The texture must reside in the same directory as the exported file in order to work in test tool and the game.

파일팩에서 SimpleTexture.bmp 파일을 토크프로젝트안의 익스포트 할 디렉토리에 복사해 넣으세요. 테스트와
게임을 위해 맵핑파일은 반드시 익스포트할 파일과 같은 위치에 있어야 합니다.


Go to the 3DSMAX Material Editor and select a material. Open the 'maps' rollout panel. In the diffuse slot,
select the button to choose a texture. Select 'bitmap' from the list. Fine and choose SimpleTexture.bmp.

맥스의 마테리얼 에디터로 갑니다. maps 롤아웃패널을 열고, 디퓨즈 슬롯에서 bipmap 버튼을 리스트에서 골라
누른 후, SimpleTexture.bmp 파일을 찾아 선택합니다.

Turn on 'Show map in Viewport'(the button looks like a little checkerboard cube)
'뷰포트에서 보이기' 버튼을 눌러주세요.(체커보드 큐브처럼 생겼습니다.)
(....왜이리 상세할까)


Make a box that encloses the entire shape.Again, do this from either the top, user or pespective view.
Align this to the world center  as above. Name this box "bounds'

닫힌 형태의 박스를 만들어주세요. 마찬가지로 탑뷰나 user뷰에서 , 월드의 중심으로 정렬시켜주시고,
'bounds'로 명명합니다.


You are now almost ready to export a DTS shape.

DTS로 익스포트할 준비가 거의 끝났습니다.


Exporting the Simple Shape:

select SimpleShape. Press the "Renumber Selection" button. A dialog box will pop up. Enter '2' in the
window and hit OK. This will add a trailing number to your shape.(this will be the detail resolution).
It does not refresh the Max interface, so deselect SimpleShape and select in again in order to see the changes.

간단한 오브젝트의 익스포팅

SimpleShape를 선택하시고, 유틸리티 탭의 DTS EXPOETER UTILITY 를 여신 후, Renumbering Selection을
선택합니다. 창이 하나 뜰 것이고, 숫자 '2'를 입력하신 후 OK를 눌러주세요. 이것은 당신의 오브젝트에 연결되는
숫자를 추가해줍니다. (괄호내용 패스) (... ) 변경내용이 바로 갱신되지 않음으로 선택을 해제했다가 다시 선택해서 변한것을 확인하세요.


Make sure SimpleShape(now named SimpleShape2.max) is selected, and press 'Embed Shape' button.
Open the schematic view. What you see should look sike this.

SimpleShape를 선택하시고(이제 이름이 SimpleShape2.max로 바뀌었죠) , Embed Shape 버튼을 눌러주세요.
그리고 schematic view를 여시면, 아래와 같이 되어있어야 합니다.


사용자 삽입 이미지

The Embed shape button correctly created a hiearachy for your shape which will allow it to export.
It did this by creating a few dummy objects and then named and linked them correctly. This can be done
manually as well, using MAX dummy objects for the base and start shapes and the detail marker.

Embed shape button은 익스포트 하기 위해 당신의 오브젝트에 계층구조를 생성합니다. 몇개의 더미를 생성한
후, 그것의 이름을 주고, 연결해줍니다. 이러한 작업은 수동적으로도 가능하며, base, start, detail 더미를
생성하여 가능합니다.


You are ready to export the shape.
Go to the Utility panel, choose the 'DTS Exporter Utility', open it and Export the shape by choosing
Export - Whole Shape.

익스포트할 준비가 됬습니다. 유틸리티 패널로 가셔서 DTS Exporter Utility 를 여신 후, Export 메뉴에서
Whole Shape를 선택해주세요.


Export this shape to your destination directory in the Torque Engine. Name the shape SimpleShape.DTS
Make sure your texture map is in the same directory as the DTS shape. If it is not, the texture will not
load and the shape will show up white.

토크엔진 디렉토리의 안의 원하는 디렉토리에 이 오브젝트를 익스포트 하세요. SimpleShape.DTS 라 명명하시고
텍스쳐 맵이 DTS 파일과 같은 폴더에 있는지 확인하세요. 만약 그렇지 않다면, 텍스쳐는 불러와지지 않을 것이고
당신의 오브젝트는 하얗게 보일 것입니다.


to be continue...


Posted by 夢現 和
:

Section I : Introduction to the Max2DTSexporter


분류1 : Max2DTSexporter의 소개


this documentation explains how to use the max2dtsExporter with 3D-Studio Max4, Max3 users
please note that most of the material contained herein also applies to Max3 but there may be some difference

이 문서는 max4와 max3에서 'max2dtsExporter' 의 사용법을 설명합니다. 설명안에 포함된 것들은 맥스3에도
적용되지만 약간의 차이점이 있을 수 있습니다.

A File Pack comtaining all example files referenced in this documentation in available for download
문서에 사용된 예제들은 모두 다운 가능합니다.


File Pack Contents:
dtsGlobal.cfg        -        컨피그파일. 글로벌 이라는 말이 붙어있는데 잘 모르겠다.
player.cfg, player.cs, player.png, player.max          - 기본적인 player 컨피그파일, player 스크립트파일
                                                                           맵핑소스 png파일, 맥스파일.
simpleShape.max
adjustLODs.mcr
unMessDTS.exe
comSkin/skin.dlm
comSkin/MaxComponents.dll
max3/max2dtsExporter.dle(Max3 compatible export plugin)
max4/max2dtsExporter.dle(Max4 compatible export plunin)


Installation:
설치하기 :

Place the file 'max2dtsExporter.dle' in the 3DSMAX 'Plugins' directory. Please make sure that you download and install the plugin for the version of MAX that you are running.

NOTE: Max plugins are compatible only with the version of the software that they were compiled for.


max3dtsExpoter.dle 파일을 3dsMAX 플러그인 폴더에 넣어주세요. 당신이 사용하고 있는 맥스의 버젼과
일치하는지 확인해주세요.

주의: 플러그인은 하나의 버젼과 서로 맞도록 컴파일 되었습니다.


General Information

This documentation assumes a certain level of familiarty with 3DStudioMax versions 3 or 4.
the majority of the information here is presented to allow users to become familiar with 'Torque' specific
tools and techniques. Where appropriate, certain basic information about how to work within 3DSMAX
has been included.

일반적인 속성

이 문서는 맥스 3버젼이나 4버젼과 맞도록 쓰여졌습니다. 이 문서의 대부분은 사용자가 어떻게 토크엔진의
특별한 툴과, 기술을 익힐 수 있느냐에 맞춰져있습니다. 어느 위치에서건 이러한 기본적인 '맥스에서 작업하기'
가 포함되어있습니다.


The DTS exporter in a utility and can be found in the 3DSMAX utility panel.

DTS 익스포터는 3DSMAX의 utility 패널에 위치한 기능입니다.

To access the utility, click on the Utility panel and press the 'more' button. This will bring up a new window
Within the new window, there will be a list. Scroll down the list and select the 'DTS Exporter Utility'

기능을 사용하기 위해서는, Utility 패널을 클릭하신 후, 'more' 버튼을 눌러주세요. 새로운 창이 생길겁니다.
새로운 창에는 리스트가 존재할 것이고, 리스트를 내려 'DTS Exporter Utility'를 선택해주세요.


It is advisable that you add 'DTS Exporter Utility' to your default set of buttons in your utility panel.
For information how to add a new button to your Utility set, please consult your 3DSMAX documentation
or help file

유틸리티 패널에 기본설정 버튼으로 DTS Exporter Utility 를 추가하는걸 추천합니다. 어떻게 새로운 버튼을
생성하는지는 MAX 문서나 헬프파일을 참고하세요.


The exporter uses 3DSMAX's units to determine the size of the object. One 3DSMAX unit is equal to one
meter in the game. : It does not matter if you have your unit scale set to centimeters, inches, or miles.
One of 'wharever' is equal to one meter in the engine. Consult your 3DSMAX documentation to set this
properly.


익스포터는 맥스의 그리드를 오브젝트의 크기를 결정하는데 사용합니다. 맥스 그리드 한칸은 게임에서 1미터와 같습니다. - 당신이 맥스의 유닛셋업을 센티미터로 하였건, 인치,마일로 했던간에 상관없습니다.
유닛셋업이 무엇으로 되어있건 한칸은 게임에서의 1meter 입니다.
셋업을 정확히 하기 위해서는 맥스의 문서를 참고하세요.


To make sure you model is facing the right direction, the front of you model show be facing towards the positive y axis in max. When you have the move tool selected in max the positive y axis is the green arrow.

당신의 모델이 적절한 방향을 바라보고 있는지 확인하세요.당신의 모델은 Y 플러스축을 바라보고 있어야 합니다.
맥스에서의 move아이콘을 선택했을 시, 맥스에서의 플러스 Y축은 녹색의 화살표입니다.


Meshes without texture coordinates will not work correctly in the game. Make sure you have UV coordinates on the meshes you are trying to export.

택스쳐가 없는 메쉬는 게임에서 제대로 보이지 않을 수 있습니다. 익스포터 하려는 오븝젝트가 UV 정보를
가지고 있는지 확인하세요.

The exporter generates a dump file named dump.dmp in the directory you are exporting to. If your export
fails, check the dump file first to see where it is crashing in the export process. Most of the time it is
something simple, like spelling the word 'bounds' wrong.

익스포터는 익스포트 하려는 디렉토리에 dump.dmp이라는 이름의 쓰레기?파일을 생성합니다.만약 익스포팅이
실패했다면, 맨 먼저 dump 파일을 뵛고, 익스포트 과정의 어디에서 문제가 생겼는지 확인해보세요.
대부분의 문제는 간단한 것으로, 'bounds'의 스펠링이 틀렸다던가 하는 것입니다.


The exporter is for the most part stable.Like all 3DSMAX plugins, it can crash. If it is constantly crashing
on export with All shapes, the error likely lies not in the exporter, but in your system configuration.

익스포터는 대부분 그렇듯 안정정이려고 합니다. 다른 max 플러그인처럼, 크래쉬날 수 있습니다. 만약
계속해서 모든 익스포트가 실패한다면, 에러는 익스포터에 있지 않고, 당신의 시스템이 있을 것입니다.


If a particular model is continually crashing on export, corrupted meshes, bad texture vertices, or double
facrs in the model might be the cause. Check your dump file, and if it stops on a particular mesh, do test
by deleting it in your scene, they try to export again.

만약 특정모델이 계속해서 익스포트에 실패한다면, 문제가 있는 모델, 잘못된 UV좌표, 혹은 겹쳐진 면이
문제를 일으킬 수 있습니다. dump파일을 확인하시고, 계속 문제가 일어난다면 장면에서 몇몇 부분을 삭제하
는 시도를 하여 다시 익스포트 해보세요.


After you have successfully exported a model, check your shapes in the showtool first before bringing
them into your game. If it works in the showtool but not in the game, the file exported properly and
the problem probably exists elsewhere

만약 모델의 익스포트에 성공한다면, 게임에 먼저 넣어보지 말고 모델뷰어에서 확인해보세요. 뷰어에서는
잘되는데 게임에서 제대로 보이지 않는다면, 익스포트는 성공했지만 아마 다른곳에 문제가 있는 것일겁니다.


The requirements of a game may be different than the requirements to get a shape exported. What is
required for it to work 'in the game' is not the same as what is required for a shape to export.
If your game requires certain nodes be present, a certain naming convention, or certain parameters set
a certain way , then get that information and set up the shape accordingly.  If your shape works in
showtool but not in the game then it is most likely not the exporter that is at fault.

게임에서 요구하는 것과 익스포터에서 요구하는 것은 다를 수도 있습니다. 만약 당신의 게임에서 보여질 특정한
노드와, 특정한 관습의 이름짓기와, 혹은 특정한 파라메터 수치를 요구한다면, 그렇나 정보를 가지고 그렇게
오브젝트를 셋팅하세요. 만약 당신의 오브젝트가 뷰어에서 잘 보이나 게임에서 그렇지 않다면, 익스포터
잘못이 아닐 확률이 높습니다.


Some of the tools and techniques outlined in this document(expecially the animation setup and usage)
require a paradigm shift about how one thinks of setting up shapes. The engine supports a very flexible
Non Linear Animation(NLA) system. It is hard at first to grasp, but with patience, one can understand and
utilize the tools controllably.

특히 애니메이션의 셋업과 사용에 대해서 몇몇의 사용법과 기술적인 부분이 이 문서에는 제외되어 있으며,
오브젝트의 셋팅에 대해서는 생각의 변화가 요구됩니다. 엔진은 매우 유동적이며 비 선형적인 애니메이션
시스템을 제공합니다. 처음 시작하기에는 어렵지만, 참을성을 가지고 하나씩 이해해나간다면, 툴을 컨트롤할 수
있을 것입니다.

( ..... 이런 샹샹바.갑자기 하기 싫어지려고 한다)


this document will take you through the steps of setting up some simple shapes that will familiarize you
with the exporter ahd how it works, and then will move on to more complex topics.

이 문서는 당신이 간단한 오븝젝트의 익스포팅을 통해 그것이 어떻게 동작하는지, 그리고 점차적으로 보다
복잡한 단계로 갈 수 있도록 단계별로 나아갈 것입니다.


-to the next page.

ps1 제 영어는 무지하게 짧습니다...
ps2 애니메이션 셋팅때문에 시작한 일인데 이 뭥미...

Posted by 夢現 和
:

TORQUE 엔진

diary/new diary 2008. 5. 8. 16:57 |
사용자 삽입 이미지

최근 토크엔진을 만지고 있다. 엔진을 만진다기 보다는 (내부소스를 만질 능력도 현재는 없고)

애니메이터로써  토크엔진을 사용하기 위해 익스포터의 사용법이나  토크엔진에 맞춘  캐릭터의 계층구조

셋업이나 ... 이런쪽을 위주로 보는 중인데, 만만치가 않다.


널리 알려지고 많이 사용되는 엔진도 아니라서 알려진 것도 적고,

레퍼런스.... 는 전체를 다루기 때문에 세부적인 것은 언급도 없다.

좀 짱인듯.


이렇게 처음으로 엔진이란걸 공부하고있자니  며칠전에 내가 누군가에게 말했던 말이 떠오른다.

모든건 연애야.


맥스라는 아가씨도 만만치 않았지만 성심성의껏 ( 스트레스를 받아가며) 상대를 알고자 시간을 쏟은 결과

이제 그와 나는 보기에 괜찮은 앙상블을 만들어낼 수 있게 되었다.


토크라는 아가씨는 흔한 아가씨도 아니고 평범하지도 않다.

그러나 내가 시간을 쏟을 수록 나는 그를 알아가게 되고, 결국 마음을 얻어 훌륭한 앙상블을 만들어낼 수 있게

될 것이다.


하물며 사람을 아는 것도 오랜 시간이 걸리며 정성이 필요하고 마음을 주어야 하는 것인데

적어도 사람처럼 변덕심하고 알 수 없는 존재보다 간단한 ( ? ) 엔진인 것이다.


근데 참 괴팍하고 까탈스런  아가씨인듯... -_- 아욱.
Posted by 夢現 和
: