
3DSMAX DTS/DSQ Export - blendAnimation - from www.smdlabs.com 번역
튜토리얼&번역/TORQUE ENGINE REFERENCE 번역 2008. 5. 15. 21:19 |이 튜토리얼의 원 저작권은 www.smdlabs.com 에 있습니다.
3DSMAX DTS/DSQ Export
blendAnimations::
Partial body blend animations:
보정 애니메이션::
부분 보정 애니메이션:
1. Partial body blend animations: You know, I sat down before dinner to write this guide, and well .... It's
been 3 hours!! I'm getting hungry, but your worth it, so I'll finish. We are almost you know! Ok, for the
last section I'm only going to talk about the differences between full body animation and blend animation.
NEVER, I REPEAT, NEVER set a key in the Blend Reference Time setting located in the Sequence01
helper node. Every time I did, 3dsMax crashed to the desktop. So, If your into that sort of thing, then go
ahead.. Have fun!!
1. 부분 보정 애니메이션: 음, 저녁 먹기전에 앉아서 쓰기 시작한 이 가이드가 음... 세시간이 됬습니다. 배고파요.
하지만 당신에게 가치가 있으니까, 끝낼겁니다. 거의 다 왔습니다. 마지막 섹션에서 전 full body 애니메이션과
부분 보정 애니메이션의 차이에 대해서 말할겁니다. 절대로, 다시말하지만 절대로!!! 시퀀스 헬퍼노드에 있는
Blend Reference Time에 키를 주지 마세요. 할 때 마다 맥스는 뻑났습니다. 자 준비가 되었으면 가보죠.
2. Ok, repeat steps 1-A thru 1-D in the Full body non-blend animation section above. This time though,
when you start animating, leave the root pose at Frame 0 intact, and start animating at Frame 1. If you
are working on the arms in the look animation, then start Frame 1 at highest point, and make the last
frame the lowest. I used about 10 to 15 frame for mine, but your the artist .. Do what you want! I fought
the exporter for what seemed like an eternity on my first blend. The thing kept crashign Max out to the
desktop. I finally figured out that you DON'T set the Blend Reference Time key in the Sequence01 object,
but instead have Frame 0 be your 'Blend reference pose'. If you set your mainModelDTSFile.max file up like I showed you, then this 'Root' position is already there for the blends, just start animating at
Frame 1 and leave Frame 0 alone.
2. 자, 이전의 단계인 보정없는 전신 애니메이션 과정 1-A부터 1-D까지 복습하세요. 이번에는, 애니메이션 작업을
하되 0 프레임의 기본 포즈는 그대로 두는 대신, 1프레임부터 애니메이션 작업을 하세요. 만약 팔을 가지고
'보는' 애니메이션 작업을 한다면 1프레임에 가장 높은 위치를 두고, 마지막 프레임에 가장 낮은 위치를 주세요.
제 작업물은 10에서 15프레임 정도였지만, 당신은 아티스트니까... 마음대로 하세요. 저는 작업의 특정 부분이
영속적인 첫 보정이 되도록 하기 위해 익스포터와 싸웠지만, 맥스는 그때마다 뻑났습니다. 저는 결국 Blend
reference time에 키를 주는 대신 0프레임에 '보정 참고용 포즈' 를 주는 방법을 알아냈습니다. 제가 보여준
대로 메인모델의 맥스파일을 작업했다면, 이러한 '뉴트럴포즈'는 전부 제대로 있을 것이므로, 단지 1프레임에서
부터 애니메이션 작업을 하세요. 0프레임은 그대로 놔두고.
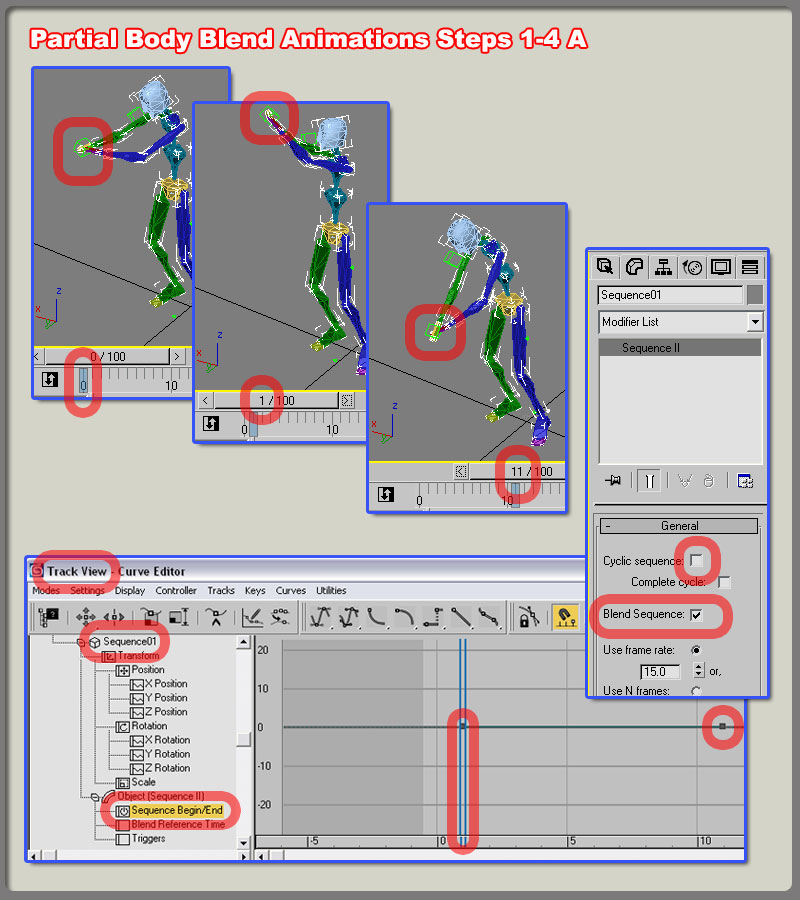
3. Another slight difference for stop 1-D above is to start the Sequence Begin/End keys in the Track View for the Sequence01 object at Frame 1 instead of Frame 0. Let me say that again : set your first key to 1 instead of 0 and obviously set the last key to the last frame of your blend animation sequence.
3. 1-D 작업과의 또다른 작은 차이는, Sequence01 오브젝트의 트랙뷰에서 Sequence 시작/끝의 키가
0이 아니라 1이라는 겁니다. 다시한번 말하죠. 시작키는 0이 아니라 1이며, 당신의 보정애니메이션의 끝에
end 키를 주세요.
4. Now with the Sequence01 object still selected, click the Modify tab from Max and Unchecked the Cyclic sequence check box and Check the Blend Sequence check box in the Sequence01 object.
A. Finally, go back to your Utility tab; DTS Exporter Utility button and click the exporter Sequence button. Save this .DSQ file in the same directory as your main .DTS file and your other .DSQ files.
4. 자, 시퀀스01 오브젝트가 선택된 상태에서, modify 탭으로 들어가셔서 Cyclic sequence 체크박스를 해제
하시고, blend sequence의 체크박스에 체크하세요.
A. 마지막으로, DTS Exporter Utility 버튼을 누르시고, 익스포트 하세요. 이 파일을 당신의 메인 DTS 파일,
그리고 다른 DSQ 파일들이 있는 곳에 저장하세요.
ps - 번역이 매끄럽지 못하여 무슨 뜻인지 이해가 안가는 부분도 있지만.. 추후 실 작업을 진행 후 수정할겁니다
>.<
3DSMAX DTS/DSQ Export
blendAnimations::
Partial body blend animations:
보정 애니메이션::
부분 보정 애니메이션:
1. Partial body blend animations: You know, I sat down before dinner to write this guide, and well .... It's
been 3 hours!! I'm getting hungry, but your worth it, so I'll finish. We are almost you know! Ok, for the
last section I'm only going to talk about the differences between full body animation and blend animation.
NEVER, I REPEAT, NEVER set a key in the Blend Reference Time setting located in the Sequence01
helper node. Every time I did, 3dsMax crashed to the desktop. So, If your into that sort of thing, then go
ahead.. Have fun!!
1. 부분 보정 애니메이션: 음, 저녁 먹기전에 앉아서 쓰기 시작한 이 가이드가 음... 세시간이 됬습니다. 배고파요.
하지만 당신에게 가치가 있으니까, 끝낼겁니다. 거의 다 왔습니다. 마지막 섹션에서 전 full body 애니메이션과
부분 보정 애니메이션의 차이에 대해서 말할겁니다. 절대로, 다시말하지만 절대로!!! 시퀀스 헬퍼노드에 있는
Blend Reference Time에 키를 주지 마세요. 할 때 마다 맥스는 뻑났습니다. 자 준비가 되었으면 가보죠.
2. Ok, repeat steps 1-A thru 1-D in the Full body non-blend animation section above. This time though,
when you start animating, leave the root pose at Frame 0 intact, and start animating at Frame 1. If you
are working on the arms in the look animation, then start Frame 1 at highest point, and make the last
frame the lowest. I used about 10 to 15 frame for mine, but your the artist .. Do what you want! I fought
the exporter for what seemed like an eternity on my first blend. The thing kept crashign Max out to the
desktop. I finally figured out that you DON'T set the Blend Reference Time key in the Sequence01 object,
but instead have Frame 0 be your 'Blend reference pose'. If you set your mainModelDTSFile.max file up like I showed you, then this 'Root' position is already there for the blends, just start animating at
Frame 1 and leave Frame 0 alone.
2. 자, 이전의 단계인 보정없는 전신 애니메이션 과정 1-A부터 1-D까지 복습하세요. 이번에는, 애니메이션 작업을
하되 0 프레임의 기본 포즈는 그대로 두는 대신, 1프레임부터 애니메이션 작업을 하세요. 만약 팔을 가지고
'보는' 애니메이션 작업을 한다면 1프레임에 가장 높은 위치를 두고, 마지막 프레임에 가장 낮은 위치를 주세요.
제 작업물은 10에서 15프레임 정도였지만, 당신은 아티스트니까... 마음대로 하세요. 저는 작업의 특정 부분이
영속적인 첫 보정이 되도록 하기 위해 익스포터와 싸웠지만, 맥스는 그때마다 뻑났습니다. 저는 결국 Blend
reference time에 키를 주는 대신 0프레임에 '보정 참고용 포즈' 를 주는 방법을 알아냈습니다. 제가 보여준
대로 메인모델의 맥스파일을 작업했다면, 이러한 '뉴트럴포즈'는 전부 제대로 있을 것이므로, 단지 1프레임에서
부터 애니메이션 작업을 하세요. 0프레임은 그대로 놔두고.
3. Another slight difference for stop 1-D above is to start the Sequence Begin/End keys in the Track View for the Sequence01 object at Frame 1 instead of Frame 0. Let me say that again : set your first key to 1 instead of 0 and obviously set the last key to the last frame of your blend animation sequence.
3. 1-D 작업과의 또다른 작은 차이는, Sequence01 오브젝트의 트랙뷰에서 Sequence 시작/끝의 키가
0이 아니라 1이라는 겁니다. 다시한번 말하죠. 시작키는 0이 아니라 1이며, 당신의 보정애니메이션의 끝에
end 키를 주세요.
4. Now with the Sequence01 object still selected, click the Modify tab from Max and Unchecked the Cyclic sequence check box and Check the Blend Sequence check box in the Sequence01 object.
A. Finally, go back to your Utility tab; DTS Exporter Utility button and click the exporter Sequence button. Save this .DSQ file in the same directory as your main .DTS file and your other .DSQ files.
4. 자, 시퀀스01 오브젝트가 선택된 상태에서, modify 탭으로 들어가셔서 Cyclic sequence 체크박스를 해제
하시고, blend sequence의 체크박스에 체크하세요.
A. 마지막으로, DTS Exporter Utility 버튼을 누르시고, 익스포트 하세요. 이 파일을 당신의 메인 DTS 파일,
그리고 다른 DSQ 파일들이 있는 곳에 저장하세요.
ps - 번역이 매끄럽지 못하여 무슨 뜻인지 이해가 안가는 부분도 있지만.. 추후 실 작업을 진행 후 수정할겁니다
>.<