
3DSMAX DTS/DSQ Export - fullAnimation - from www.smdlabs.com 번역
튜토리얼&번역/TORQUE ENGINE REFERENCE 번역 2008. 5. 15. 16:11 |이 튜토리얼의 원 저작권은 www.smdlabs.com 에 있습니다.
3DSMAX DTS/DSQ Export
fullAnimations::
Full body NON-blend animation
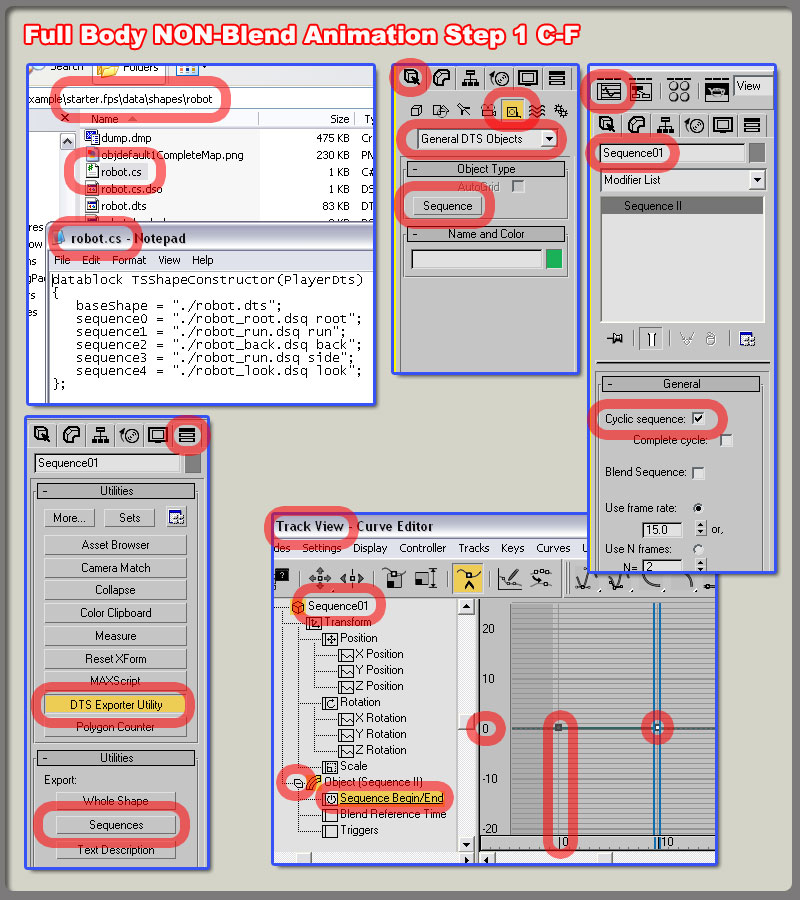
1.Full body non-blend animations: In the following steps you should delete the model mesh from your max scene when you are exporting DSQ files. This is why should have backup files! For example , if your .cfg files remove unwanted bones during an animation, and you have not removed your mesh object ; the exporter will find the model mesh with skin modifier applied that has a list of the bones you have not
exported for the animation, so it thinks your missing bones and throw an error. So, remove the mesh with
skin modifier for all DSQ animation exports.
1.full body non-blend animation: 다음스텝에서 dsq파일을 익스포트 할 때, 꼭 메쉬를 지워줘야 합니다.
이래서 꼭 파일을 미리 백업해두어야 합니다. 예를 들어, 만약 애니메이션 동안 컨피그 파일이 원하지 않
는 본을 지우게 된다면, 그리고 메쉬를 지우지 않았다면, 익스포터는 스킨 변형자에 의해 연결된 메쉬
를 본의 리스트에서 찾아내게 됩니다. 고로, 잃어버린 본이라 생각하게 되고, 에러를 던집니다.
그래서 꼭 dsq 파일을 익스포트 할 때는 메쉬를 지워줘야 합니다.
Other things to look out for : Do not set any keys in the Blend Reference Time track of the Sequence
dummy helper. Only set 2 keys in the sequence Begin/End track starting with the first key at frame 0 for non-blend animations, and a key at the last frame of the animation sequence. You can overwrite the 'root' pose and outstretched arms pose in frames 0 and 1 for full body non-blend animations, but it is worth
mentioning that this changes with blend animations.
눈여겨 보아야할 또 다른 것 : 시퀀스 더미헬퍼의 blend reference track에 키를 주지 마세요. 오직 시퀀스
의 begin/end 트랙의 시작부분 0 프레임에 하나 ( non-blend ani일때) , 그리고 끝부분에 하나, 이렇게
두개만 주세요. 뉴트럴포즈와 팔을 쫙 뻗은 포즈를 0프레임과 1프레임에 겹쳐넣으셔도 되지만, 이러한 것
은 blend 애니메이션에서는 달라집니다.
A. If you have loaded your mainModelDTSFile.max file, then choose file : save as and create a
folder called run inside of your Robot folder located in your Max scenes directory to save your new
robotRun.max file. Make sure to COPY an export .cfg file to that run directory also, and delete your
model mesh, If you want to know what is run.cfg file should look like , then here are some screen shots
below.
A. 메인 모델의 맥스파일을 불러왔으면, 다음엔 모델 폴더 안에 run 이라는 폴더를 생성하고, 그 안에
save as 로 modelRun.max 파일을 복사해 넣으세요. 컨피그 파일도 복사해서 넣는걸 잊지 마시고,
다음으론 모델의 메쉬를 지워주세요. run.cfg 파일이 어떻게 생겼냐면, 아래의 스크린샷처럼 생겼
습니다.
"NOTE" : The exporter doesn't care what you call .cfg file. It just looks in the directory that your current
Max file is in. Any file called ".cfg will be used, so make sure there is only one! Another misleading
setting is the Load Config ... and Save config ... buttons located in the DTS Exporter Utility. These buttons only set the parameters, and have nothing to do with which bones or objects will be exported. Plus, if the .cfg file in your current Max folder sets any params, then they will override the ones those buttons loaded. I hope that helps.
"주의": 익스포터는 컨피그 파일을 어떻게 이름짓던 상관하지 않습니다. 단지 폴더에 지금의 맥스파일이
있는지만 확인합니다. 어떤 파일이든 확장자가 cfg로 붙을 수 있고, 사용될 수 있으므로 확실하게
하나만 만드세요. 또 하나의 잘못된 셋팅은 DTS Exporter Utility에 있는 Load Config, Save Config 입니다
이러한 것들은 수치만 조절하지, 어떤 본, 어떤 오브젝트가 익스포트 되어야 할지는 상관하지 않습니다
또 하나 덧붙여서, 만약 현재의 맥스 폴더 안의 컨피그 파일에 어떤 수치도 정해져있지 않다면, 이러한
버튼을 눌러서 그것들을 초기화? 시킬 수 있습니다. 도움되길 바랍니다.
B. Since your new modelRun.max file started life as your 'mainModelDTSFile' you should be looking at
your model in it's root pose at frame 0. I'm hoping you know how to animate, so after you animate a
run cycle you will be ready to continue.
B. mainModelDTSFile에서부터 modelRun.max 파일이 생성된 이후에도, 당신은 모델의 0 프레임에
뉴트럴포즈가 있는지 확인해야 합니다. 나는 당신이 애니메이션을 어떻게 해야하는지 알고있길
바라며, 순환되는 달리기 애니메이션을 만들 수 있다면, 다음으로 넘어가봅시다.
C. Because you set up your .cfg file in step A!, go ahead and Click your Max Create tab; Helpers button; and select the General DTS Object from the drop down list. Click the Sequence button and add it to your scene next to your Biped bones. My Sequence dummy box was always located inside the Bounds
box, so I'm not sure if location it outside the Bounds box will cause any problems ... just food for thought
You do know this exporter is picky right? :)
C. 왜냐하면 당신은 이미 step A에서 컨피그 파일을 셋팅했습니다. 맥스의 create 탭 - helper - 리스트
에서 General DTS Object를 누르세요. 시퀀스버튼을 누르고 바이패드 옆의 본에 드래그해서 생성하세
요. 제 시퀀스 더미는 이미 바운드박스 안에 위치하기 때문에, 만약 바운드박스 밖에 생성했을 시
어떤 문제가 발생할지는 전 모릅니다. 생각할 꺼리를 줬을 뿐이에요. 당신은 이미 이 익스포터가
하찮은 일에도 법썩대는 그러한 친구란걸 알지 않나요? ^ㅅ^
D. With the Sequence01 object selected, click on the open Curve Editor tool top button. It is located to
the left of the schmatic view tool top button. In the left view pane of the Track View, click the plus box to open the details of the Sequence01 object. Now look down and do the same thing to open up the
Object(Sequence) node. Left click on the Sequence Begin/End and click the Add Keys tool tip button located near the top of the Track View window. Add the first key at Frame 0, or where you started your animation. Then add the second and final key at the last frame of your animation. Set these keys at
the 0 value line.
D. 시퀀스01 오브젝트가 선택된 상태에서, 커브에디터를 여세요. 이 버튼은 스케마틱 뷰의 왼쪽에 있습
니다. 트랙뷰의 왼쪽에서 박스열시를 누르셔서 시퀀스 오브젝트의 하부항목을 여세요. 아래를 보시고
방금 한것과 똑같이 해서 Object(sequence)의 하부항목을 여세요. 시퀀스의 시작/끝 항목을 클릭하시
고 트랙뷰 윈도우의 맨 위 근처에 있는 '키추가' 버튼을 눌러 , 0프레임이나 애니메이션이 시작되는
부분에 키를 주세요. 그리고는 애니메이션의 마지막에 두번째이자 마지막인 키를 주세요.
이러한 키들은 그 값이 0인 라인에 있도록 하게 설정합니다.
E. To review: We opened our default Max file, saved it in a new directory, made a .cfg for that directory
and new Max file, deleted the model mesh, created a full body run sequence animation, add the
Sequence01 helper node, set the keys for the start and end of the animation, and now ...
Finally .... we are ready to EXPORT!!!!!
E. 다시봅시다. 메인모델의 맥스파일을 열고, 새로운 디렉토리에 그것을 새로 저장하고, 컨피그 파일을
만들고, 모델메쉬를 지우고, full body naimation을 만들고, 시퀀스 더미를 추가해주고 애니메이션의
시작과 끝에 키를 줬습니다. 자 그럼 ..... 마침내!!!! 익스포트 할 준비가 되었습니다!!!
F. Go back to your Utility tab; DTS Exporter Utility button and click the export Sequence button. Save this . DSQ file in the same directory as your main .DTS file. You will also want any texture, etc. that your
model will need in this folder as well. If you have ShowToolPro which Highly recommend, then load
it up, and check out what you have so far. If you click the load DTS and CS button you should see
your model in it's root position, then selecting the run thread should result in your model running!
I also threw in a .cs player file for ya below.
F. 유틸리티 탭으로 돌아가서, 익스포터를 선택한 뒤, export sequence 버튼을 누르세요. 이 dsq 파일을
메인 dts 파일이 있는 곳에 저장하세요. 텍스쳐도 필요할텐데, 이 폴더에 같이 두세요. 강력히 추천하
는 ShowToolPro 가 있다면, 불러와보시고 여태 해온 것을 확인해보세요. load DTS and CS 버튼을
누르시면 당신의 모델이 뉴트럴 포즈로 서있는 것을 볼 수 있어야 하며, run 애니메이션을 불러와보면
뛰는 것이 보여야 합니다. 아래에 cs 파일도 제공합니다.
This video contains:
Full body animation overview 몸전체 애니메이션(.....)의 작업전반부
1.sequence helper creation 시퀀스더미 만들기
2. .max file setup for full body dsq export dsq파일을 익스포트 하기 위한 맥스파일의 셋업
.cs player file overview 플레이어 스크립트 파일의 전반부
1.how to setup the player.cs file 플레이어 스크립트파일 셋업하기
2.general walkthru of the process 전반적인 작업의 흐름
process overview 작업흐름
1.general overview of the setup 셋업작업의 전반적인 흐름
3DSMAX DTS/DSQ Export
fullAnimations::
Full body NON-blend animation
1.Full body non-blend animations: In the following steps you should delete the model mesh from your max scene when you are exporting DSQ files. This is why should have backup files! For example , if your .cfg files remove unwanted bones during an animation, and you have not removed your mesh object ; the exporter will find the model mesh with skin modifier applied that has a list of the bones you have not
exported for the animation, so it thinks your missing bones and throw an error. So, remove the mesh with
skin modifier for all DSQ animation exports.
1.full body non-blend animation: 다음스텝에서 dsq파일을 익스포트 할 때, 꼭 메쉬를 지워줘야 합니다.
이래서 꼭 파일을 미리 백업해두어야 합니다. 예를 들어, 만약 애니메이션 동안 컨피그 파일이 원하지 않
는 본을 지우게 된다면, 그리고 메쉬를 지우지 않았다면, 익스포터는 스킨 변형자에 의해 연결된 메쉬
를 본의 리스트에서 찾아내게 됩니다. 고로, 잃어버린 본이라 생각하게 되고, 에러를 던집니다.
그래서 꼭 dsq 파일을 익스포트 할 때는 메쉬를 지워줘야 합니다.
Other things to look out for : Do not set any keys in the Blend Reference Time track of the Sequence
dummy helper. Only set 2 keys in the sequence Begin/End track starting with the first key at frame 0 for non-blend animations, and a key at the last frame of the animation sequence. You can overwrite the 'root' pose and outstretched arms pose in frames 0 and 1 for full body non-blend animations, but it is worth
mentioning that this changes with blend animations.
눈여겨 보아야할 또 다른 것 : 시퀀스 더미헬퍼의 blend reference track에 키를 주지 마세요. 오직 시퀀스
의 begin/end 트랙의 시작부분 0 프레임에 하나 ( non-blend ani일때) , 그리고 끝부분에 하나, 이렇게
두개만 주세요. 뉴트럴포즈와 팔을 쫙 뻗은 포즈를 0프레임과 1프레임에 겹쳐넣으셔도 되지만, 이러한 것
은 blend 애니메이션에서는 달라집니다.
A. If you have loaded your mainModelDTSFile.max file, then choose file : save as and create a
folder called run inside of your Robot folder located in your Max scenes directory to save your new
robotRun.max file. Make sure to COPY an export .cfg file to that run directory also, and delete your
model mesh, If you want to know what is run.cfg file should look like , then here are some screen shots
below.
A. 메인 모델의 맥스파일을 불러왔으면, 다음엔 모델 폴더 안에 run 이라는 폴더를 생성하고, 그 안에
save as 로 modelRun.max 파일을 복사해 넣으세요. 컨피그 파일도 복사해서 넣는걸 잊지 마시고,
다음으론 모델의 메쉬를 지워주세요. run.cfg 파일이 어떻게 생겼냐면, 아래의 스크린샷처럼 생겼
습니다.
"NOTE" : The exporter doesn't care what you call .cfg file. It just looks in the directory that your current
Max file is in. Any file called ".cfg will be used, so make sure there is only one! Another misleading
setting is the Load Config ... and Save config ... buttons located in the DTS Exporter Utility. These buttons only set the parameters, and have nothing to do with which bones or objects will be exported. Plus, if the .cfg file in your current Max folder sets any params, then they will override the ones those buttons loaded. I hope that helps.
"주의": 익스포터는 컨피그 파일을 어떻게 이름짓던 상관하지 않습니다. 단지 폴더에 지금의 맥스파일이
있는지만 확인합니다. 어떤 파일이든 확장자가 cfg로 붙을 수 있고, 사용될 수 있으므로 확실하게
하나만 만드세요. 또 하나의 잘못된 셋팅은 DTS Exporter Utility에 있는 Load Config, Save Config 입니다
이러한 것들은 수치만 조절하지, 어떤 본, 어떤 오브젝트가 익스포트 되어야 할지는 상관하지 않습니다
또 하나 덧붙여서, 만약 현재의 맥스 폴더 안의 컨피그 파일에 어떤 수치도 정해져있지 않다면, 이러한
버튼을 눌러서 그것들을 초기화? 시킬 수 있습니다. 도움되길 바랍니다.
B. Since your new modelRun.max file started life as your 'mainModelDTSFile' you should be looking at
your model in it's root pose at frame 0. I'm hoping you know how to animate, so after you animate a
run cycle you will be ready to continue.
B. mainModelDTSFile에서부터 modelRun.max 파일이 생성된 이후에도, 당신은 모델의 0 프레임에
뉴트럴포즈가 있는지 확인해야 합니다. 나는 당신이 애니메이션을 어떻게 해야하는지 알고있길
바라며, 순환되는 달리기 애니메이션을 만들 수 있다면, 다음으로 넘어가봅시다.
C. Because you set up your .cfg file in step A!, go ahead and Click your Max Create tab; Helpers button; and select the General DTS Object from the drop down list. Click the Sequence button and add it to your scene next to your Biped bones. My Sequence dummy box was always located inside the Bounds
box, so I'm not sure if location it outside the Bounds box will cause any problems ... just food for thought
You do know this exporter is picky right? :)
C. 왜냐하면 당신은 이미 step A에서 컨피그 파일을 셋팅했습니다. 맥스의 create 탭 - helper - 리스트
에서 General DTS Object를 누르세요. 시퀀스버튼을 누르고 바이패드 옆의 본에 드래그해서 생성하세
요. 제 시퀀스 더미는 이미 바운드박스 안에 위치하기 때문에, 만약 바운드박스 밖에 생성했을 시
어떤 문제가 발생할지는 전 모릅니다. 생각할 꺼리를 줬을 뿐이에요. 당신은 이미 이 익스포터가
하찮은 일에도 법썩대는 그러한 친구란걸 알지 않나요? ^ㅅ^
D. With the Sequence01 object selected, click on the open Curve Editor tool top button. It is located to
the left of the schmatic view tool top button. In the left view pane of the Track View, click the plus box to open the details of the Sequence01 object. Now look down and do the same thing to open up the
Object(Sequence) node. Left click on the Sequence Begin/End and click the Add Keys tool tip button located near the top of the Track View window. Add the first key at Frame 0, or where you started your animation. Then add the second and final key at the last frame of your animation. Set these keys at
the 0 value line.
D. 시퀀스01 오브젝트가 선택된 상태에서, 커브에디터를 여세요. 이 버튼은 스케마틱 뷰의 왼쪽에 있습
니다. 트랙뷰의 왼쪽에서 박스열시를 누르셔서 시퀀스 오브젝트의 하부항목을 여세요. 아래를 보시고
방금 한것과 똑같이 해서 Object(sequence)의 하부항목을 여세요. 시퀀스의 시작/끝 항목을 클릭하시
고 트랙뷰 윈도우의 맨 위 근처에 있는 '키추가' 버튼을 눌러 , 0프레임이나 애니메이션이 시작되는
부분에 키를 주세요. 그리고는 애니메이션의 마지막에 두번째이자 마지막인 키를 주세요.
이러한 키들은 그 값이 0인 라인에 있도록 하게 설정합니다.
E. To review: We opened our default Max file, saved it in a new directory, made a .cfg for that directory
and new Max file, deleted the model mesh, created a full body run sequence animation, add the
Sequence01 helper node, set the keys for the start and end of the animation, and now ...
Finally .... we are ready to EXPORT!!!!!
E. 다시봅시다. 메인모델의 맥스파일을 열고, 새로운 디렉토리에 그것을 새로 저장하고, 컨피그 파일을
만들고, 모델메쉬를 지우고, full body naimation을 만들고, 시퀀스 더미를 추가해주고 애니메이션의
시작과 끝에 키를 줬습니다. 자 그럼 ..... 마침내!!!! 익스포트 할 준비가 되었습니다!!!
F. Go back to your Utility tab; DTS Exporter Utility button and click the export Sequence button. Save this . DSQ file in the same directory as your main .DTS file. You will also want any texture, etc. that your
model will need in this folder as well. If you have ShowToolPro which Highly recommend, then load
it up, and check out what you have so far. If you click the load DTS and CS button you should see
your model in it's root position, then selecting the run thread should result in your model running!
I also threw in a .cs player file for ya below.
F. 유틸리티 탭으로 돌아가서, 익스포터를 선택한 뒤, export sequence 버튼을 누르세요. 이 dsq 파일을
메인 dts 파일이 있는 곳에 저장하세요. 텍스쳐도 필요할텐데, 이 폴더에 같이 두세요. 강력히 추천하
는 ShowToolPro 가 있다면, 불러와보시고 여태 해온 것을 확인해보세요. load DTS and CS 버튼을
누르시면 당신의 모델이 뉴트럴 포즈로 서있는 것을 볼 수 있어야 하며, run 애니메이션을 불러와보면
뛰는 것이 보여야 합니다. 아래에 cs 파일도 제공합니다.
This video contains:
Full body animation overview 몸전체 애니메이션(.....)의 작업전반부
1.sequence helper creation 시퀀스더미 만들기
2. .max file setup for full body dsq export dsq파일을 익스포트 하기 위한 맥스파일의 셋업
.cs player file overview 플레이어 스크립트 파일의 전반부
1.how to setup the player.cs file 플레이어 스크립트파일 셋업하기
2.general walkthru of the process 전반적인 작업의 흐름
process overview 작업흐름
1.general overview of the setup 셋업작업의 전반적인 흐름