
3DSMAX DTS/DSQ Export - cfgFileSetup - from www.smdlabs.com 번역
튜토리얼&번역/TORQUE ENGINE REFERENCE 번역 2008. 5. 15. 11:51 |이 튜토리얼의 원 저작권은 www.smdlabs.com 에 있습니다.
3DSMAX DTS/DSQ Export
cfgFileSetup::
DTS/DSQ and Max file orgarnization and setup
컨피그파일 셋업
DTS/DSQ/Max파일의 구성과 셋업
Overview : Ok. before we go further, it's time to talk about orgarnization! No, don't worry about your messy
work area just yet, but do pay attention to how you orgarnize your files and folders for your test DTS/DSQ
setup project. Those .cfg files can creep up on you, and deliver hours of frustration until you figure it out!
전반적인 이해: 자, 더 앞으로 나아가기 전에, 구성에 관한 이야기를 해야겠습니다. 오 아녜요, 짜증날 것 같은
작업에 대해 미리부터 걱정하지 마세요. 하지만 DTS/DTQ 의 테스트를 위한 파일과 폴더들의 구성에 대해
관심을 가져보세요. 이러한 cfg 파일은 당신을 괴롭히고, 좌절의 시간들을 안겨줄겁니다. 당신이 cfg파일에 대해
알아낼 때 까지.
The main DTS file will contain the models root pose at frame 0 followed by the standard outstretched arms
pose int frame 1. Although the outstretched arm frame 1 pose is not required, it doesn't hurt to have it
around for maint. The Whole Shape exported DTS file will contain the bone structure and skin weighting,
as well as the UV map and texture map information if you have added that to your mesh. The Sequence
exported DSQ files only contain bone offset, animation types, etc. So, do you have the overview etched
into your brain? Good, here we go.
메인 dts 모델은 0프레임에 모델의 기본 뉴트럴포즈를 취하고 있어야 하며, 1 프레임에는 양손을 쭉 뻗은, 그러한
기본포즈를 취하고 있어야 합니다. 1프레임의 이러한 포즈는 필요하지 않을 수도 있습니다. 모든걸 익스포트한
dts 파일에는 뼈의 구조와, 스킨웨이트 값과, 그리고 당신이 원한다면 추가했을 텍스쳐맵과 UV좌표를 가지고
있습니다. 시퀀스를 익스포트한 dsq파일에는 오직 본의 초기값과, 애니메이션의 타입, 등의 정보만 담고 있습니다. 자, 작업의 전반부가 머리에 새겨지셨나요? 좋습니다. 가보죠.
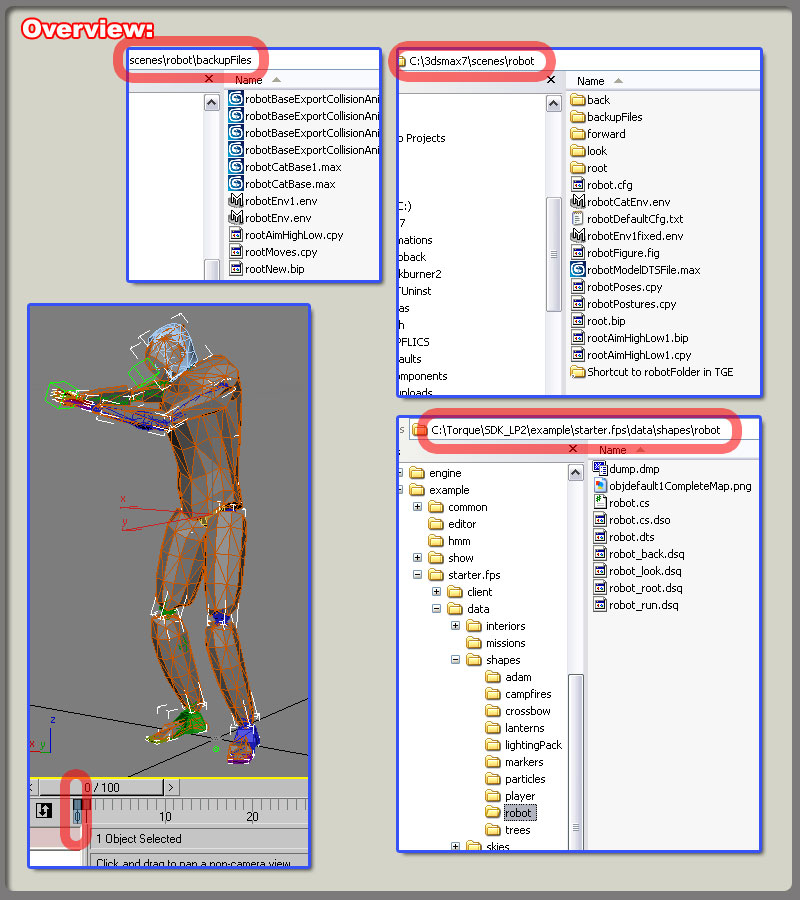
1. Lets start by creating the main DTS model file. First backup and save your Max file this far. Copy it, and
call it something like 'mainModelDTSfile.max' or something. You can save this file in your Scene folder in
Max if you want. I created a 'robot' folder inside the Scene folder of 3dsMax. Inside that folder was my
default.cfg file for my main DTS export, and my mainModelDTSFile.max file.
1. 메인이 될 DTS 파일을 생성하는 것 부터 시작해봅시다. 첫번째로, 당신의 맥스파일을 시작하기 전에 백업,
그리고 저장해두세요. 그리고 그것을 복사해서, 'mainModelDTSfile.max' 이라고 부르던 뭐라 상관없이 명명
합니다. 원한다면 맥스안의 scene 폴더 안에 저장하세요. 저는 맥스의 scene 폴더 안에 robot 이라는 폴더를
만들었습니다. 그 안에는 메인의 dts 익스포터와 'mainModelDTSfile.max' 를 위한 default.cfg 라는 컨피그
파일이 있습니다.
A. This mainModelDTSFile.max should have everything we have done so far, plus : At Frame 0 add
the Root pose for your model. (See screen shot above)
A. 이 메인맥스파일에는 여태 작업해온 것들이 포함되어 있어야 하며, 추가로 - 0 프레임에 당신 모델의 뉴트럴
포즈를 추가해주세요. ( 스샷 참고)
B. You should still have the mesh, bones, skin modifier, eye, mount0, camara, and schematic setup that
we just finished doing in your scene. Note : There is NO sequence dummy object yet! That will come in
just a minute.
B. 맥스파일 안에는 여전히 메쉬, 본, 스킨변형자, eye,mount0과 같은 더미노드들, 그리고 막 끝낸 스케마틱
셋업이 포함되어 있어야 합니다. 주의점 - 아직 시퀀스 더미노드는 없습니다. 곧 나옵니다.
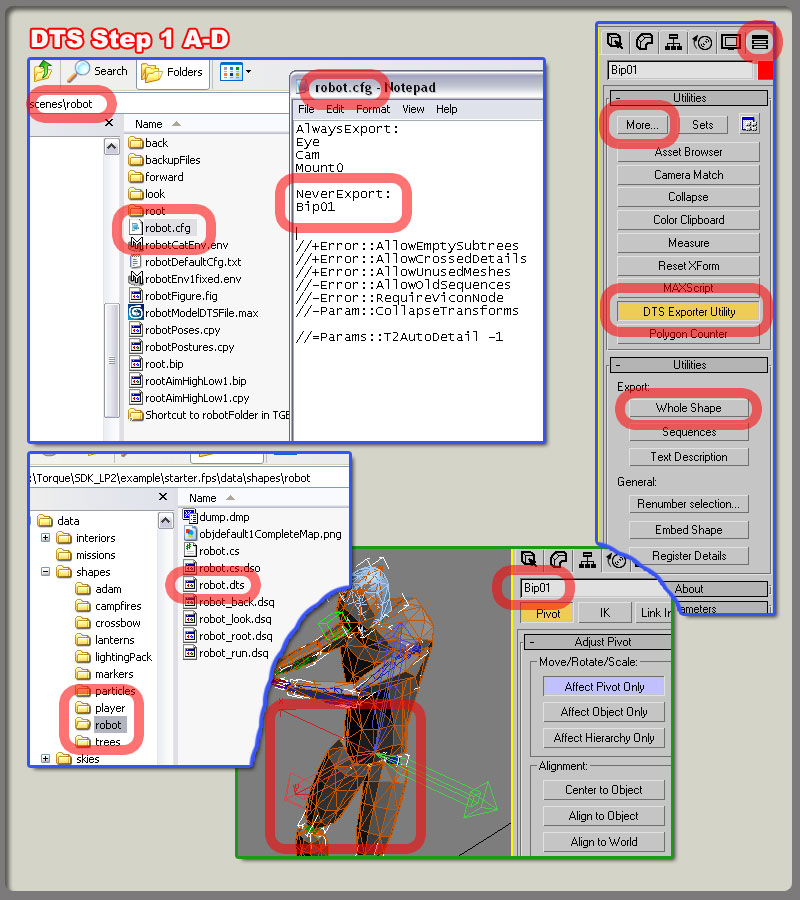
C. The Exporter looks in the folder where your current Max file is located and should fine one .cfg file.
Since we are creating the main DTS file we will want everything we have created so far in export, minus
the root Bip01 object. FYI : The root Bip01 bone node has a screwed up pivot axis that is a parent to the correct pelvis node pivot axis. If you fail to NeverExport : the Bip01 node , then it will be used instead of the correct pelvis axit pivot, and your model will be facing sideways in the game instead of stright ahead
See screen shots below for a sample main DTS object. cfg file setup file.
C. 익스포터는 당신의 맥스파일이 위치한 폴더에서 컨피그 파일을 찾습니다. bip01 뿌리노드를 제외한 우리가
여태 만들어온 것들은 모두 익스포트 되어야 합니다. - 당신을 위해 : bip01 뿌리노드는 꼬인 피봇정보를
가지고 있으며 이 노드는 제대로된 피봇정보를 가지고 있는 골반노드의 상위노드입니다. 만약 bip01 뿌리
노드를 익스포트 해버린다면, 골반노드의 피봇정보 대신 bip01의 피봇정보를 사용하게 될 것이며, 결국
당신의 모델은 똑바로 바라보고 있지 않고 엉뚱한 면을 바라보고 있게 될 겁니다. 위에 있는 예제 스샷을 보시
고, 컨피그 파일도 살펴보세요.
D. Now go to your utility tab ; DTS Exporter Utility button and click the export Whole Shape button. Save the file in a folder located next to the standard Players folder in your game directory. See screen shots.
D . 유틸리티 탭으로 가세요. DTS Exporter Utility 버튼을 누르시고, Whole Shape 버튼을 누르셔서 게임
디렉토리의 옆에 위치한 standard Player 폴더에 익스포트 결과물을 저장하세요. 아래의 스샷을 보죠.
2. Now let's finally talk about exporting the indivisual DSQ files for each animation thread. There is good
documentation on the differences between blend and non-blend animation, so for now we are just going
to cover how to actually export each one. "NOTE" : Don't adjust the standard Max 30frames per second
setting, or start scaling time. I noticed crashing when I played around with it, so I thought I would pass
that aling. I also noticed some crashes and failed exports when I played with the frame rate setting on the
Sequences dummy node also. so I would not play with that one either. You can control the speed of your
animation just fine with the default settings. Example: 10 frame animation is fast, 100 frame animation is
slow. etc.
2. 자 그럼 드디어 각 애니메이션을 dsq파일로 익스포트 하는 것에 대하여 이야기해보지요. blend 애니메이션과
non- blend 애니메이션의 차이에 대해서 이야기한 좋은 문서가 있으므로, 우리는 단지 그것들을 어떻게 뽑아
내는지에 대해서만 이야기할 겁니다. "주의" : 맥스의 기본설정인 1초에 30프레임 이란 단위를 조절하거나
건드리지 마세요. 그런 것들을 건드렸을 때 뻑났습니다. 그래서 이런 부분은 안건드릴 겁니다. 또한 시퀀스
더미에 있는 프레임 비율을 건드렸을 때도 뻑나는걸 경험했습니다. 이런 부분도 안만집니다. 맥스의 기본 시간
설정으로 애니메이션의 속도를 컨트롤 하는 것으로 충분합니다. 예 ) - 10프레임 애니메이션은 빠르고,100프레
임 애니메이션은 깁니다.
A. Ok, from within this 'robot' folder located inside the 3dsMax scenes folder I created new folders
describing different actions. For example; 'forward' , 'back', 'root', 'look', etc. Inside each of these
folders is a Max file that started out as a copied mainModelDTSFile.max file. Then I added ONE and
only one.cfg file for each of these action folders. See screen shots below.
A. 자, 맥스의 scene 폴더 안의 robot 폴더 안에, 저는 동작을 묘사한 각각의 폴더를 만들었습니다. 예를 들어
'앞으로', '뒤로', '기본', '보다' 이렇게요. 그리고 각각의 폴더에 mainModelDTSFile.max 파일을 복사해서
넣었습니다. 그리고 또한 각각의 폴더에 컨피그 파일을 넣어주었구요. 스크린샷을 보죠.

This video contains: 영상에 담긴내용
.max file directory structure 맥스파일의 폴더 구조
1. an example project directory structure 프로젝트 디렉토리 구조의 예
2. overview of file organization 파일조직의 전반부
.cfg file and dsq sequence 컨피그 파일과 dsq 시퀀스
1.how to setup different . cfg files for dsq export. 다른 dsq파일을 위한 각각의 컨피그파일의 셋업
2.the difference between full and partial export files 애니메이션의 전체/부분 익스포트의 차이점
process overview 작업진행 전반부
1. general overview of .cfg file setup for animated sequence 애니메이션된 시퀀스의 컨피그파일 셋업 전반부
영상 - http://torque.smdlabs.com/media/freeTutorials/maxdts/page4.htm
3DSMAX DTS/DSQ Export
cfgFileSetup::
DTS/DSQ and Max file orgarnization and setup
컨피그파일 셋업
DTS/DSQ/Max파일의 구성과 셋업
Overview : Ok. before we go further, it's time to talk about orgarnization! No, don't worry about your messy
work area just yet, but do pay attention to how you orgarnize your files and folders for your test DTS/DSQ
setup project. Those .cfg files can creep up on you, and deliver hours of frustration until you figure it out!
전반적인 이해: 자, 더 앞으로 나아가기 전에, 구성에 관한 이야기를 해야겠습니다. 오 아녜요, 짜증날 것 같은
작업에 대해 미리부터 걱정하지 마세요. 하지만 DTS/DTQ 의 테스트를 위한 파일과 폴더들의 구성에 대해
관심을 가져보세요. 이러한 cfg 파일은 당신을 괴롭히고, 좌절의 시간들을 안겨줄겁니다. 당신이 cfg파일에 대해
알아낼 때 까지.
The main DTS file will contain the models root pose at frame 0 followed by the standard outstretched arms
pose int frame 1. Although the outstretched arm frame 1 pose is not required, it doesn't hurt to have it
around for maint. The Whole Shape exported DTS file will contain the bone structure and skin weighting,
as well as the UV map and texture map information if you have added that to your mesh. The Sequence
exported DSQ files only contain bone offset, animation types, etc. So, do you have the overview etched
into your brain? Good, here we go.
메인 dts 모델은 0프레임에 모델의 기본 뉴트럴포즈를 취하고 있어야 하며, 1 프레임에는 양손을 쭉 뻗은, 그러한
기본포즈를 취하고 있어야 합니다. 1프레임의 이러한 포즈는 필요하지 않을 수도 있습니다. 모든걸 익스포트한
dts 파일에는 뼈의 구조와, 스킨웨이트 값과, 그리고 당신이 원한다면 추가했을 텍스쳐맵과 UV좌표를 가지고
있습니다. 시퀀스를 익스포트한 dsq파일에는 오직 본의 초기값과, 애니메이션의 타입, 등의 정보만 담고 있습니다. 자, 작업의 전반부가 머리에 새겨지셨나요? 좋습니다. 가보죠.
1. Lets start by creating the main DTS model file. First backup and save your Max file this far. Copy it, and
call it something like 'mainModelDTSfile.max' or something. You can save this file in your Scene folder in
Max if you want. I created a 'robot' folder inside the Scene folder of 3dsMax. Inside that folder was my
default.cfg file for my main DTS export, and my mainModelDTSFile.max file.
1. 메인이 될 DTS 파일을 생성하는 것 부터 시작해봅시다. 첫번째로, 당신의 맥스파일을 시작하기 전에 백업,
그리고 저장해두세요. 그리고 그것을 복사해서, 'mainModelDTSfile.max' 이라고 부르던 뭐라 상관없이 명명
합니다. 원한다면 맥스안의 scene 폴더 안에 저장하세요. 저는 맥스의 scene 폴더 안에 robot 이라는 폴더를
만들었습니다. 그 안에는 메인의 dts 익스포터와 'mainModelDTSfile.max' 를 위한 default.cfg 라는 컨피그
파일이 있습니다.
A. This mainModelDTSFile.max should have everything we have done so far, plus : At Frame 0 add
the Root pose for your model. (See screen shot above)
A. 이 메인맥스파일에는 여태 작업해온 것들이 포함되어 있어야 하며, 추가로 - 0 프레임에 당신 모델의 뉴트럴
포즈를 추가해주세요. ( 스샷 참고)
B. You should still have the mesh, bones, skin modifier, eye, mount0, camara, and schematic setup that
we just finished doing in your scene. Note : There is NO sequence dummy object yet! That will come in
just a minute.
B. 맥스파일 안에는 여전히 메쉬, 본, 스킨변형자, eye,mount0과 같은 더미노드들, 그리고 막 끝낸 스케마틱
셋업이 포함되어 있어야 합니다. 주의점 - 아직 시퀀스 더미노드는 없습니다. 곧 나옵니다.
C. The Exporter looks in the folder where your current Max file is located and should fine one .cfg file.
Since we are creating the main DTS file we will want everything we have created so far in export, minus
the root Bip01 object. FYI : The root Bip01 bone node has a screwed up pivot axis that is a parent to the correct pelvis node pivot axis. If you fail to NeverExport : the Bip01 node , then it will be used instead of the correct pelvis axit pivot, and your model will be facing sideways in the game instead of stright ahead
See screen shots below for a sample main DTS object. cfg file setup file.
C. 익스포터는 당신의 맥스파일이 위치한 폴더에서 컨피그 파일을 찾습니다. bip01 뿌리노드를 제외한 우리가
여태 만들어온 것들은 모두 익스포트 되어야 합니다. - 당신을 위해 : bip01 뿌리노드는 꼬인 피봇정보를
가지고 있으며 이 노드는 제대로된 피봇정보를 가지고 있는 골반노드의 상위노드입니다. 만약 bip01 뿌리
노드를 익스포트 해버린다면, 골반노드의 피봇정보 대신 bip01의 피봇정보를 사용하게 될 것이며, 결국
당신의 모델은 똑바로 바라보고 있지 않고 엉뚱한 면을 바라보고 있게 될 겁니다. 위에 있는 예제 스샷을 보시
고, 컨피그 파일도 살펴보세요.
D. Now go to your utility tab ; DTS Exporter Utility button and click the export Whole Shape button. Save the file in a folder located next to the standard Players folder in your game directory. See screen shots.
D . 유틸리티 탭으로 가세요. DTS Exporter Utility 버튼을 누르시고, Whole Shape 버튼을 누르셔서 게임
디렉토리의 옆에 위치한 standard Player 폴더에 익스포트 결과물을 저장하세요. 아래의 스샷을 보죠.
2. Now let's finally talk about exporting the indivisual DSQ files for each animation thread. There is good
documentation on the differences between blend and non-blend animation, so for now we are just going
to cover how to actually export each one. "NOTE" : Don't adjust the standard Max 30frames per second
setting, or start scaling time. I noticed crashing when I played around with it, so I thought I would pass
that aling. I also noticed some crashes and failed exports when I played with the frame rate setting on the
Sequences dummy node also. so I would not play with that one either. You can control the speed of your
animation just fine with the default settings. Example: 10 frame animation is fast, 100 frame animation is
slow. etc.
2. 자 그럼 드디어 각 애니메이션을 dsq파일로 익스포트 하는 것에 대하여 이야기해보지요. blend 애니메이션과
non- blend 애니메이션의 차이에 대해서 이야기한 좋은 문서가 있으므로, 우리는 단지 그것들을 어떻게 뽑아
내는지에 대해서만 이야기할 겁니다. "주의" : 맥스의 기본설정인 1초에 30프레임 이란 단위를 조절하거나
건드리지 마세요. 그런 것들을 건드렸을 때 뻑났습니다. 그래서 이런 부분은 안건드릴 겁니다. 또한 시퀀스
더미에 있는 프레임 비율을 건드렸을 때도 뻑나는걸 경험했습니다. 이런 부분도 안만집니다. 맥스의 기본 시간
설정으로 애니메이션의 속도를 컨트롤 하는 것으로 충분합니다. 예 ) - 10프레임 애니메이션은 빠르고,100프레
임 애니메이션은 깁니다.
A. Ok, from within this 'robot' folder located inside the 3dsMax scenes folder I created new folders
describing different actions. For example; 'forward' , 'back', 'root', 'look', etc. Inside each of these
folders is a Max file that started out as a copied mainModelDTSFile.max file. Then I added ONE and
only one.cfg file for each of these action folders. See screen shots below.
A. 자, 맥스의 scene 폴더 안의 robot 폴더 안에, 저는 동작을 묘사한 각각의 폴더를 만들었습니다. 예를 들어
'앞으로', '뒤로', '기본', '보다' 이렇게요. 그리고 각각의 폴더에 mainModelDTSFile.max 파일을 복사해서
넣었습니다. 그리고 또한 각각의 폴더에 컨피그 파일을 넣어주었구요. 스크린샷을 보죠.
This video contains: 영상에 담긴내용
.max file directory structure 맥스파일의 폴더 구조
1. an example project directory structure 프로젝트 디렉토리 구조의 예
2. overview of file organization 파일조직의 전반부
.cfg file and dsq sequence 컨피그 파일과 dsq 시퀀스
1.how to setup different . cfg files for dsq export. 다른 dsq파일을 위한 각각의 컨피그파일의 셋업
2.the difference between full and partial export files 애니메이션의 전체/부분 익스포트의 차이점
process overview 작업진행 전반부
1. general overview of .cfg file setup for animated sequence 애니메이션된 시퀀스의 컨피그파일 셋업 전반부
영상 - http://torque.smdlabs.com/media/freeTutorials/maxdts/page4.htm