
3DSMAX DTS/DSQ Export - basicSetup - from www.smdlabs.com 번역
튜토리얼&번역/TORQUE ENGINE REFERENCE 번역 2008. 5. 15. 10:47 |이 튜토리얼의 원 저작권은 www.smdlabs.com 에 있습니다.
3DSMAX DTS/DSQ Export
basicSetup::
3dsMax scene setup for ANIMATED model:
기본적인 셋업::
애니메이션된 모델의 3dsmax에서의 셋업:
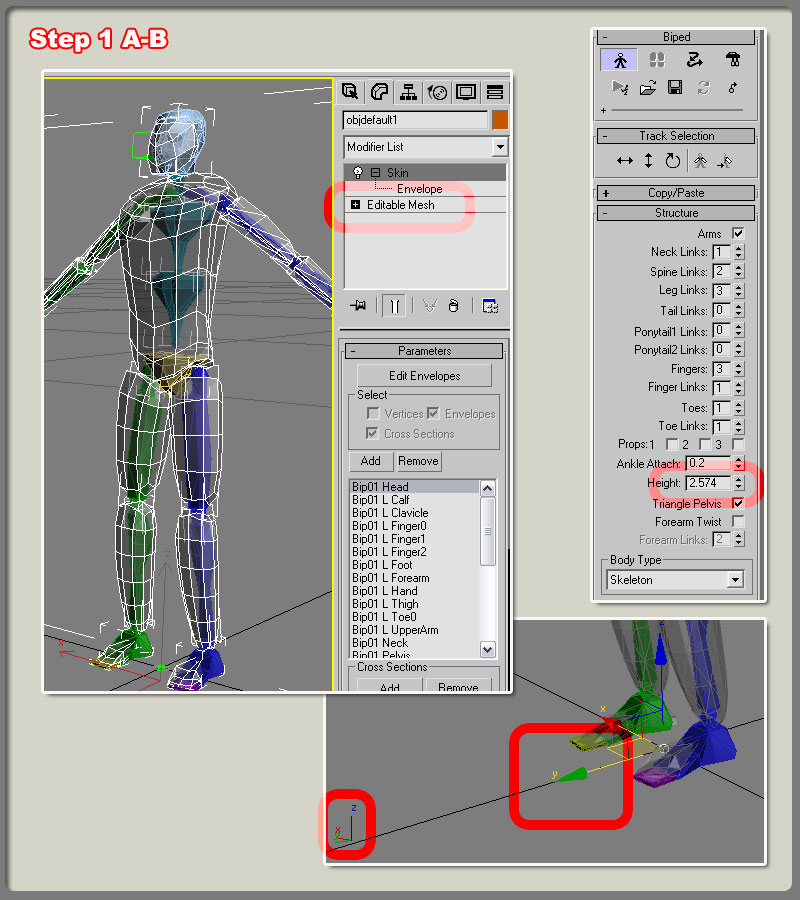
1.Start with the mesh of your model. It does not matter if you have your UV map and textures set at this
point, as I have added them later without ill effects. In max you will need to callapse your stack before
applying the skin modifier, so go ahead and convert it into an EDITABLE MESH.
NOTE : the model I started with was originally an editable poly. It never did export, so go ahead and convert it to mesh. The exporter doesn't like the editable polys much.
1.당신의 모델과 함게 시작해봅시다. 이 시점에서 당신의 모델이 UV맵이 펴있는지, 텍스쳐가 있는지는 중요하지
않습니다. 적절한 때에 언급할겁니다. 맥스에선 스킨변형자를 적용하기 전에 작업목록을 모두 합치는 것이 필요합니다. 그러니, 모델을 editable mesh 로 변환해주세요.
Note : 제가 시자간 모델은 본디 editable poly였으며, 익스포트 하지 않았습니다. 그러니 걱정말고 맥스로 가셔서
mesh로 변환하세요. 익스포터는 폴리를 그닥 좋아하지 않습니다.
A. Make sure it is the proper scale. I have fount that 2.57 units in Max is just about right. This will of
course be very small in max, so knock the dust off your zoom key! ( 1 max unit = 1 Torque meter which is
about 3 feet in game)
B. Now make your your model is facing down the positive Y axis!
A. 모델의 크기가 적절한 지 확인하세요. 맥스에서의 2.57유닛이 가장 적절한 것을 알아냈습니다. 이 사이즈는
맥스에선 아주 작은 사이즈이므로, 줌키를 팍팍 당기세요 ( 맥스의 1 유닛 = 토크의 1 미터= 게임상에서 3피트)
B. 그럼 모델이 Y 플러스 축을 바라보고 있는지 확인하세요!
2. Time for the dreaded bounding box! In the Top view of Max add a plain dol standard box. Make sure it
starts at the models feet and extends enough above his head to allow for jumping. The sides should also
be wide enough to give plenty of room even with the models arms fully stretched out. This box is used to
tell the exporter to include all the mesh that is fully inside the bounds. Now rename this Box to Bounds.
2. bounds박스를 만들 시간입니다. 탑뷰에서 맥스에서의 평범한 상자를 만드세요. 모델의 발 끝에서부터
시작해서, 점프를 해도 괜찮을 만큼 넉넉하게 만들어주세요. 양 측면 역시 모델이 팔을 쭉 뻗더라도 충분히 감싸
도록 넓어야 합니다. 이 박스는 익스포터에게 박스 안의 모든 메쉬를 포함시키라는 이야기를 하게 됩니다.
자 그럼 박스의 이름을 bounds 로 바꿔주세요.
A. The bounds box also gives Torque a reference point from which to orient the model into the game
world. That is why it is important to have you model facing the positive Y axis! Also, don't scale your
bounds box! If you have, just delete it and start over.
A. bounds 박스는 또한 토크엔진에게 모델의 기본 정렬을 어떻게 할 것인지 말해줍니다. 이것이 왜 당신의
모델이 Y 플러스 방향을 바라보고 있어야 하는 것이 중요한 이유입니다. 또한, bounds 박스의 크기를
조절하지 마세요. 만약 이미 그랬다면, 지우고 다시 만드세요.
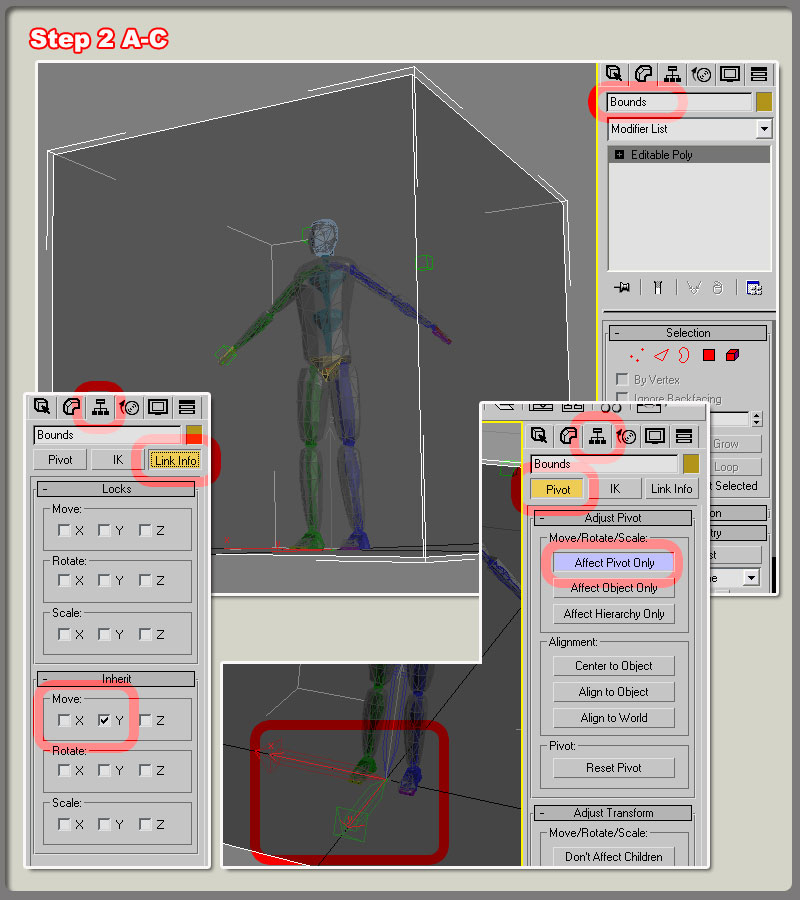
B. Time to adjust ( or at least check) the Bounds box pivot. In Max select the Bounds box and click the
Hierarchy tab, Pivot button, and Affect Pivot Only button. You should see a large set of axis arrows in
your viewport. Use your Move button to adjust this big axis arrow to the middle of your model and the
bottom of his feet. The Green Y axis should be facing down the positive Y axis. See the screen shots
below if you're scratching your head about now. This pivot procedure is also used to check weapon
mount orientation, etc.
B. bounds 박스의 피봇을 조절할 시간입니다.(아님 확인이라도) 맥스에서 bounds 박스를 선택하고, hierarchy
탭에 들어가셔서 피봇버튼을 누르시고, Affect Pivot Only 버튼을 누르세요. 뷰포트에서 화살표 뭉치를 보실 수
있을 겁니다. 이 화살표뭉치를 모델의 중심에 맞추시고, 모델의 발 위치로 내리세요. 녹색 화살표인 Y화살표는
Y 플러스 방향을 가리키고 있어야 합니다. 머리를 쥐어뜯을 것 같으면 아래의 스크린 샷을 보세요. 이러한
피봇작업 절차는 무기의 mount 정렬에도 사용됩니다.
C. Now we need to attach the bounds box to the Bip01 node by clicking the Bounds box object ; Hierarchy
tab ; Link Info button; and set the Inherit/ Move settings checkbox of the Y axis. This will make the
bounds box subsequent orientation axis follow the model during animation. This is good if your only
animation forward and back. If you plan on animating side to side, then check the X axis also.
C. 자, 그럼 이제 bounds 박스를 bip01 노드에 연결시켜봅시다. 박스를 선택하고 - hierarchy탭 - linkInfo -
Inherit/Move 셋팅의 Y axis의 체크박스에 체크하세요. 이렇게 해서 bounds박스가 모델이 애니메이션 되는
동안 따라서 움직이게 될 겁니다. 이것은 당신의 애니메이션이 앞 뒤로 움직일 때만 한정합니다.
만약 좌우로도 움직일 예정이라면, X 축에도 체크해주세요.
This video contains:
Bounds box information - 바운드박스 정보
1.what is it used for - 뭐에 쓰이는가?
2.how to link it to the skeleton root node - bip01 노드에 연결하기
3. enable the inherit y axis and /or x axis - y축이나 x축의 상속움직임 가능하게하기
More on pivot points - 피봇에 대해 더
1.how bounds box pivot point affects import - 바운드박스의 피봇이 미치는 영향
2.bounds box location information - 바운드박스의 위치정보
3.pivot point rotation information - 바운드박스의 회전정보
영상은 http://torque.smdlabs.com/media/freeTutorials/maxdts/page1.htm 여기.
3DSMAX DTS/DSQ Export
basicSetup::
3dsMax scene setup for ANIMATED model:
기본적인 셋업::
애니메이션된 모델의 3dsmax에서의 셋업:
1.Start with the mesh of your model. It does not matter if you have your UV map and textures set at this
point, as I have added them later without ill effects. In max you will need to callapse your stack before
applying the skin modifier, so go ahead and convert it into an EDITABLE MESH.
NOTE : the model I started with was originally an editable poly. It never did export, so go ahead and convert it to mesh. The exporter doesn't like the editable polys much.
1.당신의 모델과 함게 시작해봅시다. 이 시점에서 당신의 모델이 UV맵이 펴있는지, 텍스쳐가 있는지는 중요하지
않습니다. 적절한 때에 언급할겁니다. 맥스에선 스킨변형자를 적용하기 전에 작업목록을 모두 합치는 것이 필요합니다. 그러니, 모델을 editable mesh 로 변환해주세요.
Note : 제가 시자간 모델은 본디 editable poly였으며, 익스포트 하지 않았습니다. 그러니 걱정말고 맥스로 가셔서
mesh로 변환하세요. 익스포터는 폴리를 그닥 좋아하지 않습니다.
A. Make sure it is the proper scale. I have fount that 2.57 units in Max is just about right. This will of
course be very small in max, so knock the dust off your zoom key! ( 1 max unit = 1 Torque meter which is
about 3 feet in game)
B. Now make your your model is facing down the positive Y axis!
A. 모델의 크기가 적절한 지 확인하세요. 맥스에서의 2.57유닛이 가장 적절한 것을 알아냈습니다. 이 사이즈는
맥스에선 아주 작은 사이즈이므로, 줌키를 팍팍 당기세요 ( 맥스의 1 유닛 = 토크의 1 미터= 게임상에서 3피트)
B. 그럼 모델이 Y 플러스 축을 바라보고 있는지 확인하세요!
2. Time for the dreaded bounding box! In the Top view of Max add a plain dol standard box. Make sure it
starts at the models feet and extends enough above his head to allow for jumping. The sides should also
be wide enough to give plenty of room even with the models arms fully stretched out. This box is used to
tell the exporter to include all the mesh that is fully inside the bounds. Now rename this Box to Bounds.
2. bounds박스를 만들 시간입니다. 탑뷰에서 맥스에서의 평범한 상자를 만드세요. 모델의 발 끝에서부터
시작해서, 점프를 해도 괜찮을 만큼 넉넉하게 만들어주세요. 양 측면 역시 모델이 팔을 쭉 뻗더라도 충분히 감싸
도록 넓어야 합니다. 이 박스는 익스포터에게 박스 안의 모든 메쉬를 포함시키라는 이야기를 하게 됩니다.
자 그럼 박스의 이름을 bounds 로 바꿔주세요.
A. The bounds box also gives Torque a reference point from which to orient the model into the game
world. That is why it is important to have you model facing the positive Y axis! Also, don't scale your
bounds box! If you have, just delete it and start over.
A. bounds 박스는 또한 토크엔진에게 모델의 기본 정렬을 어떻게 할 것인지 말해줍니다. 이것이 왜 당신의
모델이 Y 플러스 방향을 바라보고 있어야 하는 것이 중요한 이유입니다. 또한, bounds 박스의 크기를
조절하지 마세요. 만약 이미 그랬다면, 지우고 다시 만드세요.
B. Time to adjust ( or at least check) the Bounds box pivot. In Max select the Bounds box and click the
Hierarchy tab, Pivot button, and Affect Pivot Only button. You should see a large set of axis arrows in
your viewport. Use your Move button to adjust this big axis arrow to the middle of your model and the
bottom of his feet. The Green Y axis should be facing down the positive Y axis. See the screen shots
below if you're scratching your head about now. This pivot procedure is also used to check weapon
mount orientation, etc.
B. bounds 박스의 피봇을 조절할 시간입니다.(아님 확인이라도) 맥스에서 bounds 박스를 선택하고, hierarchy
탭에 들어가셔서 피봇버튼을 누르시고, Affect Pivot Only 버튼을 누르세요. 뷰포트에서 화살표 뭉치를 보실 수
있을 겁니다. 이 화살표뭉치를 모델의 중심에 맞추시고, 모델의 발 위치로 내리세요. 녹색 화살표인 Y화살표는
Y 플러스 방향을 가리키고 있어야 합니다. 머리를 쥐어뜯을 것 같으면 아래의 스크린 샷을 보세요. 이러한
피봇작업 절차는 무기의 mount 정렬에도 사용됩니다.
C. Now we need to attach the bounds box to the Bip01 node by clicking the Bounds box object ; Hierarchy
tab ; Link Info button; and set the Inherit/ Move settings checkbox of the Y axis. This will make the
bounds box subsequent orientation axis follow the model during animation. This is good if your only
animation forward and back. If you plan on animating side to side, then check the X axis also.
C. 자, 그럼 이제 bounds 박스를 bip01 노드에 연결시켜봅시다. 박스를 선택하고 - hierarchy탭 - linkInfo -
Inherit/Move 셋팅의 Y axis의 체크박스에 체크하세요. 이렇게 해서 bounds박스가 모델이 애니메이션 되는
동안 따라서 움직이게 될 겁니다. 이것은 당신의 애니메이션이 앞 뒤로 움직일 때만 한정합니다.
만약 좌우로도 움직일 예정이라면, X 축에도 체크해주세요.
This video contains:
Bounds box information - 바운드박스 정보
1.what is it used for - 뭐에 쓰이는가?
2.how to link it to the skeleton root node - bip01 노드에 연결하기
3. enable the inherit y axis and /or x axis - y축이나 x축의 상속움직임 가능하게하기
More on pivot points - 피봇에 대해 더
1.how bounds box pivot point affects import - 바운드박스의 피봇이 미치는 영향
2.bounds box location information - 바운드박스의 위치정보
3.pivot point rotation information - 바운드박스의 회전정보
영상은 http://torque.smdlabs.com/media/freeTutorials/maxdts/page1.htm 여기.