
DTS exporter introduction from TORQUE DEVELOPEMENT NETWORK 번역 3
튜토리얼&번역/TORQUE ENGINE REFERENCE 번역 2008. 5. 12. 22:20 |Introducton to the ShowTool
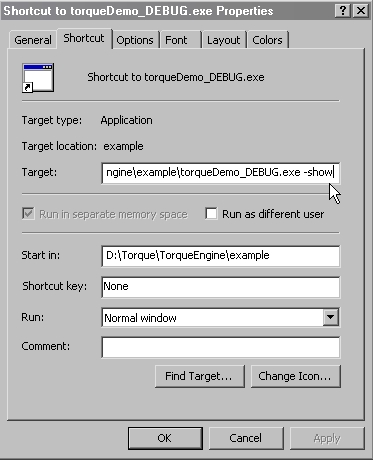
The showtool can be accessed by putting the argument - show when you launch the application. This can
be done from the command line, but it is easier(especially for artist types) to just add the switch into a
shortcut
쇼툴의 소개
- 구버젼의 쇼툴인듯하여 번역패스(...)
간략한 쇼우툴의 인터페이스
W - zoom in
S - zoom out
A - rotate left
D - rotate right
E - rotate camera up
C - rotate camera down
Z - rotate camera right
X - rotate camera left
...........이전 구버젼에서는 마우스 인터페이스를 지원하지 않았던건가, 전혀 먹질 않습니다.
현재 사용중인건 Torque ShowTool Pro 버젼 1.0 이라, 매칭되지 않습니다. 고로
관련없는 부분 역시 번역 패스.
추후 추가될 부분 -
simple shape with detail levels
detail level in the showtool
multiRes
collision objects
material and textures
Sequence Objects:
Sequence objects are necessary if animation is to be exported. The sequence object tell exporter how
to export animation data over a given range of time in 3DSMAX, and what to call the sequence.
A sequence object can be created like any other helper object found within 3DSMAX.
시퀀스 오브젝트.
시퀀스 오브젝트는 애니메이션을 추출할 때 필요합니다. 시퀀스 오븝젝트는 익스포터에게 3dsmax에서 설정된
시간의 애니메이션을 어떻게 추출할 것인지 , 그리고 어떻게 불러야 할 것인지 익스포터에게 알려줍니다.
시퀀스 오브젝트는 3dsmax에서 포함하는 어떤 헬퍼로던 생성할 수 있습니다.
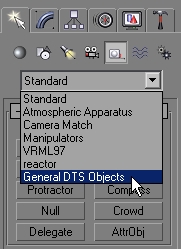
This is done in the Create tab by clicking on the "Helpers" menu, and then using the pull down menu to
choose "General DTS Objects". See the section on the Sequence Object Parameters(found below) for
more details about sequence object.
헬퍼 메뉴를 선택하면 뜨는 생성 탭 장면입니다. 그리고 아래로 내려 'General DTS Object' 를 선택하세요.
더 자세한 것을 알고자 한다면 Sequence Object Parameter 파트를 보세요.
Sequence helpers that you place in the scene are unlinked objects that float unlinked in the world
(they do not need to be linked to anything)
화면에 위치한 시스템헬퍼는 어떤 것에도 연결될 필요가 없는 떠잇는 오브젝트입니다.
Simple Shape with Animation:
Open SimpleShape5.max locatted in the documentation file pack.
The shape has been animated. Note that only the highest level of tetail is animated, and the lower detail
levels are not.
애니메이션을 포함한 간단한 오브젝트:
simpleshape5.max 파일을 열어주세요.
오브젝트는 애니메이션이 되어있으며, 가장 상위 detail 레벨의 오브젝트만 애니메이션이 가능하며 하위레벨의
오브젝트들은 애니메이션 되지 않는 다는 것을 알아두세요.
Create a sequence helper. Name it SimpleAnimation. Open the trackview and fine the Track for SimpleAnimation. Now, using the create key button, add a keyframe at frame 0 in the 'Sequence Begin/End'
track. Put another one at frame 40.
시퀀스헬퍼를 생성합니다. SimpleAnimation이라 명명합니다. 트랙뷰를 여시고 SimpleAnimation 이라고 명명된
트랙을 찾으세요. 자, 키생성 버튼을 클릭하시고, '시퀀스의 시작/끝' 이라 명명된 트랙의 0프레임에, 그리고
40프레임에 키를 추가합니다.
That is all that needs to be done. Export the shape and open it in the ShowTool. it will be animation when
you open it. Use the detail slider to go through the detail levels and notice that all the detail levels are
using the animation form the main detail level. The transforms of the lower detail levels have been discarded
and they are instead using the transform from the highest detail level.
이것들이 해야할 일의 다입니다. 오브젝트를 익스포트하고 뷰어에서 열어보세요. 열면 애니메이션이 될 것입니다
디테일 슬라이더를 조절해서 하위레벨로 옮아가보아도, 최상위레벨의 애니메이션 데이터를 참고하여 모두 같은
애니메이션이 되는 것을 확인할 수 있습니다. 하위레벨이 가지고있던 변화 정보는 제거되고, 대신에 최상위레벨의 애니메이션 데이터를 사용하게 됩니다.
Visibility:
The Torque Engine support animated visibility.
Visibility is controlled by an object's visibility track. A visibility track of on object can be created in the
Track View (consult your 3DSMAX documentation on how to do this).
토크엔진은 애니메이션의 보이기/보이지 않기 기능을 지원합니다. 이것은 오븝젝트의 보이기/보이지않기 트랙을
조절하여 가능합니다. 이러한 트랙은 트랙뷰에서 생성가능합니다.
If the value of the visibility property is 1 the item is visible, if it is 0 or less item is no visible. This much
is the same as before. But now as the value goes from 0 to 1 the shape will fade in. If you don't want the
object to fade in but go from visible to invisible all at once, then make sure visibility goes from 0 to 1
instantaneously.
만약 visibility 값이 1이면 오브젝트는 보입니다. 0이거나 0보다 낮다면 보이지 않습니다. 이러한 값의 양은
전과 같습니다. 그러나 0부터 1로 값이 변한다면 오브젝트는 서서히 사라질것입니다. 만약 당신이 오브젝트가
서서히 사라지는 것이 아니라 순식간에 보이는 상태에서 보이지 않게 되길 원한다면 수치의 값도 그렇게 되도록
조절하세요.
Visibility animation must be checked in the Export control parameters rollout.
이러한 가시 아니메이션은 반드시 익스포터의 파라메터에 체크를 해줘야합니다.
Simple Shape with Visibility Animation
Open SimpleShape6.max located int the documentation file pack.
Select the object and open the track view. Notice that it has a visibility track and that the track is animated
A value of 1.0 makes the object fully visible, and a value of 0.0 makes the object fully invisible
(intermediate values are allowed. A value of 0.5 will make the object 50% transparent.)
간단한 오브젝트의 가시 애니메이션
simpleshape6.max 파일을 어세요. 오브젝트를 선택하시고 트랙뷰를 여세요.
오브젝트가 가시트랙이 설정되어 있는지, 그리고 그 트랙이 애니메이션 되는지 확인하세요.
1의 수치는 오브젝트를 온전히 보이게 하고, 0의 값은 보이지 않게 합니다.
(중간의 값도 허용됩니다. 0.5의 수치는 50%의 가시도를 가집니다.)
Make sure 'Visibility Animation' is checked in the Sequence 'export control' rollout and export the shape.
When you check it in the showtool, you will notice that just like transform animation, the lower detail levels
have accquired the visibility animation.
'가시 애니메이션' 의 항목이 시퀀스의 export control에 체크되어 있는지 확인하고, 익스포트합니다.
뷰어에서도 체크를 하면, 마치 이전처럼, 하위단계의 디테일 오브젝트 역시 가시 애니메이션이 적용되는 것을
볼 수 있습니다.
일단 이 문서는 여기로 끝. TDN에서도 이 문선s OldDoc 이라고 명시하고 있으며,
실제로 이 문서에서 다루는 것은 맥스 3과 4버젼이며, 뷰어인 ShowTool 역시 버젼이 낮다.
게다가 가장 중요한 목적이었던 바이패드를 심은 캐릭터의 온전한 익스포팅, 컨트롤 포인트 등은
다루고 있지 않았으니...
다른 문서를 찾아봐야겠다.