
DTS exporter introduction from TORQUE DEVELOPEMENT NETWORK 번역 2
튜토리얼&번역/TORQUE ENGINE REFERENCE 번역 2008. 5. 12. 16:11 |1page에 이어.
A Simple Shape
you can use the SimpleShape.max in the file pack to follow along with.
동봉된 파일팩 안에 있는 SimpleShape.Max를 사용해도 됩니다.
From either the top, user, or perspective view, make a sphere with 16 sides. Make sure the shpere has
mapping coordinates by putting a check in the checkbox at the bottom of the creation panel.Align the sphere
to the center of the world using the transform type - in floater.(While in Move Mode, go to Tool. Transform Type-In) and enter 0 in all the boxes in "Absolute World". Name this shape "SimpleShape".
top뷰,user뷰,pespective 뷰의 어느 곳에서건 간단한 16면의 구를 만드세요. 크리에이션 패널의 하단부에
체크박스에 체크를 해서 맵핑 좌표를 생성하는 것을 확인하세요.
구를 월드 좌표의 중심에 정렬하세요. SimpleShape 라고 명명하세요.
Copy SimpleTexture.bmp from the file pack and put it in your export destination directory in the Torque project. The texture must reside in the same directory as the exported file in order to work in test tool and the game.
파일팩에서 SimpleTexture.bmp 파일을 토크프로젝트안의 익스포트 할 디렉토리에 복사해 넣으세요. 테스트와
게임을 위해 맵핑파일은 반드시 익스포트할 파일과 같은 위치에 있어야 합니다.
Go to the 3DSMAX Material Editor and select a material. Open the 'maps' rollout panel. In the diffuse slot,
select the button to choose a texture. Select 'bitmap' from the list. Fine and choose SimpleTexture.bmp.
맥스의 마테리얼 에디터로 갑니다. maps 롤아웃패널을 열고, 디퓨즈 슬롯에서 bipmap 버튼을 리스트에서 골라
누른 후, SimpleTexture.bmp 파일을 찾아 선택합니다.
Turn on 'Show map in Viewport'(the button looks like a little checkerboard cube)
'뷰포트에서 보이기' 버튼을 눌러주세요.(체커보드 큐브처럼 생겼습니다.)
(....왜이리 상세할까)
Make a box that encloses the entire shape.Again, do this from either the top, user or pespective view.
Align this to the world center as above. Name this box "bounds'
닫힌 형태의 박스를 만들어주세요. 마찬가지로 탑뷰나 user뷰에서 , 월드의 중심으로 정렬시켜주시고,
'bounds'로 명명합니다.
You are now almost ready to export a DTS shape.
DTS로 익스포트할 준비가 거의 끝났습니다.
Exporting the Simple Shape:
select SimpleShape. Press the "Renumber Selection" button. A dialog box will pop up. Enter '2' in the
window and hit OK. This will add a trailing number to your shape.(this will be the detail resolution).
It does not refresh the Max interface, so deselect SimpleShape and select in again in order to see the changes.
간단한 오브젝트의 익스포팅
SimpleShape를 선택하시고, 유틸리티 탭의 DTS EXPOETER UTILITY 를 여신 후, Renumbering Selection을
선택합니다. 창이 하나 뜰 것이고, 숫자 '2'를 입력하신 후 OK를 눌러주세요. 이것은 당신의 오브젝트에 연결되는
숫자를 추가해줍니다. (괄호내용 패스) (... ) 변경내용이 바로 갱신되지 않음으로 선택을 해제했다가 다시 선택해서 변한것을 확인하세요.
Make sure SimpleShape(now named SimpleShape2.max) is selected, and press 'Embed Shape' button.
Open the schematic view. What you see should look sike this.
SimpleShape를 선택하시고(이제 이름이 SimpleShape2.max로 바뀌었죠) , Embed Shape 버튼을 눌러주세요.
그리고 schematic view를 여시면, 아래와 같이 되어있어야 합니다.
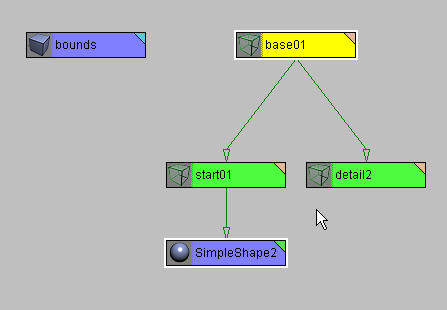
The Embed shape button correctly created a hiearachy for your shape which will allow it to export.
It did this by creating a few dummy objects and then named and linked them correctly. This can be done
manually as well, using MAX dummy objects for the base and start shapes and the detail marker.
Embed shape button은 익스포트 하기 위해 당신의 오브젝트에 계층구조를 생성합니다. 몇개의 더미를 생성한
후, 그것의 이름을 주고, 연결해줍니다. 이러한 작업은 수동적으로도 가능하며, base, start, detail 더미를
생성하여 가능합니다.
You are ready to export the shape.
Go to the Utility panel, choose the 'DTS Exporter Utility', open it and Export the shape by choosing
Export - Whole Shape.
익스포트할 준비가 됬습니다. 유틸리티 패널로 가셔서 DTS Exporter Utility 를 여신 후, Export 메뉴에서
Whole Shape를 선택해주세요.
Export this shape to your destination directory in the Torque Engine. Name the shape SimpleShape.DTS
Make sure your texture map is in the same directory as the DTS shape. If it is not, the texture will not
load and the shape will show up white.
토크엔진 디렉토리의 안의 원하는 디렉토리에 이 오브젝트를 익스포트 하세요. SimpleShape.DTS 라 명명하시고
텍스쳐 맵이 DTS 파일과 같은 폴더에 있는지 확인하세요. 만약 그렇지 않다면, 텍스쳐는 불러와지지 않을 것이고
당신의 오브젝트는 하얗게 보일 것입니다.
to be continue...